I first wrote about termbase reorganization in 2013, after the upgrade from SDL Trados Studio 2011 to SDL Trados Studio 2014 alerted users to the need to reorganize termbases.
Seven years later, and almost two years after SDL Trados Studio 2019 first came out, we no longer see this reminder, but may still need to run a termbase reorganization now and then to improve term recognition.
If you've run into a situation where you just know your termbase contains certain terms but are not seeing those terms being recognized, try reorganizing your termbase, it may just be what you need to get things working as they should.
Below are the steps to quickly reorganize your termbases.
1. Open your termbase in Multiterm.
If you haven't installed Multiterm yet, go to your SDL account, download the program and install it. Once installed, double-clicking a termbase file (*.sdltb) in Windows Explorer will open the termbase in Multiterm.
2. Reorganize the termbase
With the termbase(s) open in Multiterm, go to Termbase Management, make sure the Home tab is selected and click on Reorganize and select the termbases you want to reorganize. Note that you can run the process on several termbases at once.
The reorganization process is pretty fast, so you should be done in only a few minutes, or maybe even seconds, if the termbase is small.
After the process is complete, you can close Multiterm and go back to SDL Trados Studio, where you should start seeing improved term recognition.
A few months ago I wrote about using Dragon to add terms to a secondary termbase. While this is great for Dragon users, it doesn't help those who either don't use Dragon or want to use their keyboard to accomplish this. Luckily, there's a great tool to automate practically any task one can think of: AutoHotkey.
So, below is a very simple AutoHotkey script to help achieve something that's not currently possible in SDL Trados Studio: adding a term to a secondary termbase while we work.
If you don't have it yet, you will first need to download AutoHotkey and install it.
To get started quickly, you will also want to download my Add Term to Secondary Termbase script. The script is an ahk file that must be saved where you can find it later. Please note that I've only recently started learning about AutoHotkey, so I'm aware that this is not the most sophisticated or elegant solution to this problem, but it works for me, so I thought I'd share it in case others find it useful.
A general note about ahk files: AutoHotkey files can be easily inspected and edited by opening them in a text editor. I like Notepad++. To make the script active, once AutoHotkey has been installed, all you need to do is double-click the ahk file. To disable the script, go to the system tray and locate the green icon with a white H, right-click and select Exit. You can have several scripts active at once. Hovering over each of the green icons will display a tooltip indicating the name of the appropriate script/ahk file.
What this script does
This script launches a series of steps that one would perform manually to add a term to a termbase that is open in MultiTerm. Note that this works in the Flags layout in MultiTerm. Other layouts (such as the Default layout that will be available with MultiTerm 2017), may require a different sequence of steps.
Hotkey
The hotkey used to deploy this script from within Studio is F12. This is just a personal preference. Please note that activating the script means that F12 will no longer do whatever it does now in Studio, so if you're using F12 for something else, you can change the hotkey to one that won't create any conflicts. To do that, you simply open the ahk file in a text editor, replace F12:: with your own preferred hotkey, for example F9:: (the two colons designate the hotkey in AutoHotkey), save the file and double-click on it again to activate the changes.
These are the steps that are launched after pressing the hotkey:
1. The selected text is copied to the clipboard. Note: The source term should be selected prior to hitting the hotkey.
2. Focus is changed from Studio to MultiTerm. For this to work, MultiTerm must be open, with the appropriate termbase where terms are to be added open as well.
3. The cursor is placed in the source field.
4. The contents of the clipboard are pasted into the source field.
5. The cursor is placed in the target field.
At this point, the target term must be entered manually. After you've finished typing in the target term, hit F12 again, and the following will happen:
6. The entry will be saved to the termbase
7. Focus will be returned to Studio
8. The cursor will be placed in the target column of the Studio Editor
Dissecting the script
This is the content of the script, with a brief explanation of each line.
So, to summarize what you need to do to start adding terms to a secondary termbase as you work in Studio:
1. Open Multiterm and open your secondary termbase
2. From within Studio, when you want to add a new term to your secondary termbase, select the source term and press F12
3. When the cursor appears in the target field in Multiterm, enter your target term.
4. Press F12
And here's a short video demonstrating the process:
Final words
Like I said earlier, I only know the bare minimum about AutoHotkey, although seeing its potential, I plan to keep learning. If you'd also like to learn more, the AutoHotkey website is a great resource, and I can't recommend these two blogs enough for specific use cases relevant to translators:
Multifarious: Paul Filkin has two great posts about AutoHotkey that can help us get started with the tool.
Gonduana: If you read Spanish, Jesús Prieto's series of posts about AutoHotkey are both enjoyable to read and very educational.
So there you have it, a not-so-elegant but working solution to our little problem. I hope you find it useful!
Update
Thanks to Jesús Prieto's suggestions, there is now a Version 2 of the script, which you can download here. With this new and improved script you can now also copy the target term to the clipboard. After doing that, focus changes to MultiTerm, where both terms are entered into the appropriate fields, the entry is saved and focus is returned to Studio.
To use this new script, load it by double clicking on the file and then:
1. In Studio, select your source term, then press F12. A message will pop-up asking you to select the target term.
2. Select the target term.
3. Click OK to close the message box. A new message box will pop up displaying the source and target terms, click OK (or press Enter).
After doing this, the script will switch focus to MultiTerm, where your secondary termbase must be open, paste the terms in the appropriate fields and save the entry, all without any user intervention. Focus will then be returned to Studio.
I have always wanted to be able to add terms to a secondary termbase while I'm working in Studio. As we all know, this is not possible out of the box, but with a Dragon script, it is now as easy as saying "Add term to secondary termbase".
Required software: Dragon NaturallySpeaking Professional 13, or DNS 13 Premium + KnowBrainer 2016, or Dragon Professional Individual 14, Studio and Multiterm
* For a very basic intro to creating commands, you may want to read this first.
I've created two scripts for this: one that pastes the source term into Multiterm, where the user will have to type or dictate the target term next, and another one that automatically populates the dictated target term, sort of like Add New Term and Quick Add New Term features in Studio, except that the terms will be added to whatever termbase is open and active in Multiterm.
Step 1: Create your commands in Dragon or KnowBrainer
Feel free to copy and paste the scripts below. Script 1: Add selected source term to secondary termbase
Example of what you say: "Add term to secondary termbase"; this is the command name and must be spoken exactly as entered in the script. You can choose your own command name.
Command name: Add term to secondary termbase (adapt to whatever you prefer)
Description: Adds the selected source term to a secondary termbase (opens Multiterm) - not open-ended
Sub Main
SendKeys"^c"Wait 1
AppBringUp"C:\Program Files (x86)\SDL\SDL MultiTerm\MultiTerm12\MultiTerm.exe"Wait 1
SendKeys"{F3}{Tab}"Wait .2
SendKeys"{Tab}^v"Wait .5
SendKeys"{Tab}"EndSub
The above script is shown in the KnowBrainer Command Editor window
Script 2: Add selected source term and dictated target term to secondary termbase
Example of what you say: "Add term worker", where "worker" is the target term that will be added to the Multiterm entry
Command name:Add term <dictation> (if you haven't, please read the section about open-ended commands here) Description: Adds the selected source term to a secondary termbase, inserts the dictated term into the target field, and saves the entry
Sub Main
SendKeys"^c"Wait 1
AppBringUp"C:\Program Files (x86)\SDL\SDL MultiTerm\MultiTerm12\MultiTerm.exe"Wait 1
SendKeys"{F3}{Tab}"Wait .2
SendKeys"{Tab}^v"Wait .5
SendKeys"{Tab}"Wait .5
SendKeys ListVar1
Wait .2
SendKeys"{Enter}"SendKeys"{F12}"EndSub
The above script is shown in the KnowBrainer Command Editor window
Using your commands
Before running your commands, open your secondary termbase in Multiterm. If the termbase is added to you current Studio project, you will have access to the terms you add as you translate. You can minimize Multiterm after doing this.
That's all you need to do. If you're using KnowBrainer, you will see the new commands in the Sidebar, ready to be used. KnowBrainer helpfully lists the commands available for the active program in its sidebar, and highlights the recognized commands as they are used.
Duplicates in a Multiterm termbase can clutter up the term recognition list in Studio and make files larger than they need to be, so it makes sense to keep our termbases as duplicate-free as possible. Here's a quick and easy how-to for termbase maintenance.
Step 1. Convert the termbase to an Excel file
The easiest and fastest way to do this is to use the Open Exchange Glossary Converter app. It's a simple matter of dragging and dropping the termbase onto the app, and just like that, an Excel file will be created in the same folder where the exported termbase is stored.
Step 2. Remove duplicates in Excel
Open the converted file in Excel, and go to Data - Data Tools - Remove Duplicates. Excel will tell you how many duplicates were removed and how many entries are still left.
Step 3. Convert the Excel file back to a termbase
Once again, drag and drop the file (the Excel file this time) onto the Glossary Converter and let it work its magic. You can either overwrite the existing termbase or save it under a new name.
And that's all there is to it. The whole process doesn't take more than a few minutes. Of course, all the standard data back-up warnings apply, and it's advisable to make a copy of the termbase before starting the process, just in case.
While following the standard import process to reimport the same glossary into Multiterm (for example, after the glossary has grown) will result in duplicate entries, the steps below help prevent this problem.
When you're ready to import your glossaries, you will see two standard import definitions in Multiterm, called "Default import definition" and "Synchronize on Entry Number". Neither one of these can be used to avoid duplicate entries, but they can be used as the basis to create a new one.
1. Right click on Synchronize on Entry Number and choose Duplicate. This will make a copy of the import definition.
2. Right click on Copy of Synchronize on Entry Number and choose Edit. This will open the Import Wizard, which lists the steps the wizard will go through. The change we need to make to avoid duplicate entries is on Step 4 (Exclude invalid entries from the import), so click Next.
3. Give a more user-friendly name to your new import definition. I have chosen "Avoid Duplicates" for this example. You can also add a description. Click Next.
4. Choose the file that contains the entries you want to import. Alternatively, you can leave these fields blank and choose your import files later. Click Next. When the wizard asks for an Exclusion File name under Validation Settings, type any name.
5. This takes us to the key step, Step 4. The default here is "Synchronize entries on entry number", but choosing this will result on duplicate entries if for some reason your glossaries got rearranged. Select "Synchronize entries on index term". Click Next.
6. Now we choose our Advanced Options for synchronizing on index terms. To keep things simple, I leave the Index as Source, and under "Index term does not exist in the target termbase", leave "Add import entry as new", because otherwise the new entries will not be added to the termbase. For "Index term exists in the target termbase", change the Action to "Omit import entry" if you want to skip it altogether, or choose one of the other options based on your needs.
Click Next a couple more times and the wizard closes, leaving you with a new import definition like this:
Finally, to make sure you can use this new import definition with any of your termbases, be sure to save it by right-clicking and choosing Save. This will save a file with an xdi extension, which you can later load into any other termbase, by right clicking the Import Definition area and choosing Load.
Now, whenever you need to reimport a glossary and you want to avoid getting duplicate entries in your termbase, run this new import definition by right-clicking it and choosing Process.
December 2015 Update: Read Paul Filkin's detailed explanation about the Glossary Converter, a great Open Exchange app that simplifies glossary management in Studio. For the original text of this post, please keep reading below. Although you can enter terms manually in Multiterm, a more efficient way of populating a termbase is importing and already existing glossary.
Multiterm offers several import options. In this post we will see how to import glossaries from an Excel file.
MS Excel: Preparing your bilingual glossaries
Start with a two-column Excel file. To make things easier, make sure the first row in your Excel file includes your language names.
Multiterm Convert: Convert Excel file to be imported into Multiterm
After your Excel file is ready, the next step is converting it to a format that Multiterm can import. To do this, you will need to use SDL Multiterm Convert, which you will find in the same Program group as SDL Multiterm Desktop.
After clicking Next, you will see this screen:
Leave the options as they are and click Next. In the next screen, choose Microsoft Excel format.
Clicking next will open up the screen where you will select the Excel file you want to convert. Click the Browse button next to the Input file field. Find your Excel file and select it. This will populate all 4 fields. Note the location of the Output file (by default the same location where your Excel file is stored).
Click Next.
Now, this is the critical step. On the next screen, choose each language name on the left, select Index filed on the right, and under Index field, select the same language.
See a quick video below:
Click Next.
Don't make any other changes in the following screens, just click Next until you're done.
This screen shows that the conversion was successful and tells you how many term entries were converted.
Clicking on Next takes you to the last screen in the Multiterm Convert process. Click Finish. This will close Multiterm Convert.
You can watch a video of the entire conversion process below.
Multiterm Desktop: Importing your converted glossaries
Now that the Excel file has been converted, we're ready to import it into Multiterm.
Go to SDL Multiterm Desktop and open the termbase you want to import your terms into.
With the termbase open, click the Catalog tab on the bottom left of your screen:
The Catalog View will show you the name of the termbase and several options. Click on Import.
Right click on Default import definition, on the right-hand panel:
This will bring up a context menu. Select Process.
In the screen that opens, click Browse and select the Output file created by Multiterm Convert. Check Fast import, and click Next.
Click Next again. This starts the Import process. When the file has been imported, you will see a screen like this.
Click Next and then Finish to exit the Wizard.
If you click the Terms tab in SDL Multiterm Desktop, you will see the imported terms listed as part of your termbase.
You can repeat the Import process to add terms from other converted Excel glossaries to the same termbase.
Taking advantage of term recognition in SDL Trados Studio can greatly enhance the translation process.
Assuming you've already created a termbase, this post will explain how to to use your termbase in Studio. If you don't have a termbase yet, maybe you'd like to read about creating new termbases or importing Excel glossaries first.
In this example, no project has been created in Studio, I've simply opened a single file for translation.
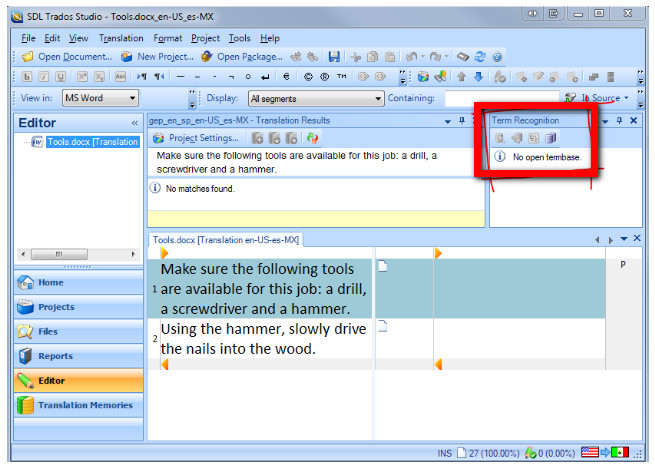
With your document open for translation in SDL Trados Studio, in the Editor view, if no termbases have been selected, you will see a message under the Term Recognition window that says "No open termbase".
Click on the Termbase icon right above that message.
This will take you to the Project Settings window. Click on Add and select your termbase.
Then in the window that opens, click on Browse, go to the location where you stored your termbase, and select it.
Click OK.
You will now see your termbase loaded in the Project Settings window. Clicking OK will return you to Studio, where you will now see the Term Recognition window populated with any terms found both in the segment to be translated and in the open termbase.
If you have AutoSuggest set to include termbases, you will see the term appear in the AutoSuggest window as you type the first letter. Select the term you want with the arrow keys, hit Enter and the term is inserted in your target text.
Or use Ctrl+Shift+L to show all the terms recognized in the segment, then choose the one you want using the arrow keys and hit Enter to insert it in the target segment.
A few finishing notes to keep in mind:
You can have more than one termbase open at once in Studio. Simply repeat the procedure to open more termbases.
You can add terms to your termbase as you work. Select the source and target terms, right click on the segment and choose Add New Term.
You can set a default termbase to open automatically with all new documents. Just go to Tools-->Options-->Language Pairs-->All Language Pairs-->Termbases and Add your default termbase.
Using a termbase in any CAT tool greatly enhances the translation process. Studio has many powerful features to make the most of your termbases, and this post only explains the basics to get your termbases up and running in Studio, but I hope it will pique your curiosity to try more advanced features.
December 2015 Update: Read Paul Filkin's detailed explanation about the Glossary Converter, a great Open Exchange app that simplifies glossary management in Studio. For the original text of this post, please keep reading below.
This how-to guide will be divided in three parts tackling the main steps in termbase creation and use:
1. Multiterm is a separate program, it's not part of Trados or Studio. It needs to be downloaded and installed separately, and it appears as a standalone program in your SDL folder in your All Programs list in Windows. If you don't see it there, make sure to go to your SDL account and download and install the program from the My Downloads page.
2. Termbases cannot be created in Studio or Trados. The "Create New Termbase" you see in the SDL Trados Synergy main page or the "Terminology Management" button in the Studio home page are merely links that will take you to Multiterm, if it's installed in your computer.
Creating a simple Multiterm termbase
Multiterm can be as simple or as complex as you want it to be. In this example I will create the simplest kind of termbase: source term=target term. No other index fields will be included.
1. Open SDL Multiterm Desktop (in this example I will use SDL Multiterm 2009 SP4).
Once in Multiterm, Go to File, then select Create Termbase.
Save your termbase in the dialog box that opens:
After saving the termbase, the Termbase Wizard will open:
Click Next.
Click Next on Step 1 of 5 of the Wizard without making any changes.
In Step 2 of 5, enter a Friendly Name for your termbase. This is the name you will see when choosing your termbase in Studio. To keep things simple, I'll use the same name I used before.
Click Next. In Step 3 of the Wizard, choose your languages. In this example I will use English and Spanish. After selecting each on the left, click Add so they will appear under Selected index fields:
Click Next. For this simple termbase you can leave Step 4 blank, just click Next.
Also leave Step 5 blank. Click Next.
This completes the Wizard. Click Finish.
And with this you have finished creating your termbase. Clicking on the Catalog tab on the bottom left of your Multiterm screen will show you the termbase and its statistics. In this case the termbase has been created but it's empty.
To manually add terms, click on the Terms tab on the bottom left of your screen, click F3 or click on the Add New Entry icon right under the Edit menu. You will see the Entry screen, as shown below.
Double click on the little box next to the pencil icon and enter the term for each entry.
Press F12 to save the changes.
The term is now part of your termbase and therefore will be available when you use the termbase in Studio.