Showing posts with label trados. Show all posts

Tuesday, June 21, 2022

Restoring file type associations and icons

I can't remember exactly when this happened, but for the past couple of days, all sdlxliff files on my computer are displaying a MemoQ icon instead of the actual Trados Studio one.


Not only that, but the sdlxliff file type is associated with MemoQ, which means that if I double-click on an sdlxliff file, my computer tries to open it with MemoQ.


If you've encountered the same inconvenience with this file type or any other, here's how to fix it.


File type associations

1. On the Windows File Explorer, right click on any of the problem files and select Properties, then click the Change button on the Properties dialog box.


2. Select the right program from the list to restore the file type association. 


The icon will also change to reflect the one for the program you have chosen. If that's still not the right file type icon, keep reading to learn how to change it.

If the program you want to use is not in the short list, click on "More apps" and locate the appropriate program on your computer.*

3. After clicking OK, you should see the new program icon associated with your files.


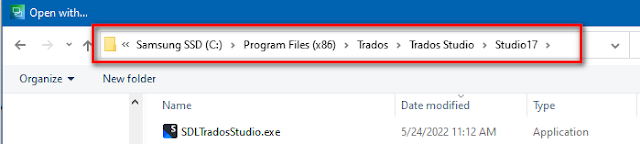
In the example above, I've associated the sdlxliff file type with Trados Studio 2021, which shows in the short list. To associate the file type with Trados Studio 2022, so that sdlxliff files will open in the new version when I double-click on them, all I need to do is find the program in the path shown in the screenshot below.


Icons

After completing the steps above, you may still not have the right icons. For example, I'm currently seeing this:


If you're familiar with Trados Studio files, you know that this isn't right. The project file type is showing a blank page icon and the sdlxliff file type is showing the Trados Studio program icon. 

Unfortunately, changing icons is not a simple process, and it involves tweaking the Windows registry. Fortunately, RWS has provided an article with 3 possible solutions to this issue, one of which is a nicely packaged file that you can simply download and run.

A word of caution: Make sure to make a backup of your current registry. You will find a link to detailed instructions in the RWS article.

Here's the result, after running the .reg file:


Now each file type is showing the correct icon.

And that's all there is to it. No more hijacked file type associations and icons!


Friday, November 12, 2021

Adding Spellchecking Languages to Trados Studio

There may be cases where Trados Studio's spellchecking option appears greyed out with a "Language Not Supported" legend. For example, this is what happens if I have a project that has Venezuelan Spanish as the target language.


Luckily, there is an easy solution to this.


1. Go to the App Store and download the Hunspell Dictionary Manager. In this example, I'm using the integrated app store from within Trados Studio 2021.


2. After installing the app and restarting Trados Studio, go to the Welcome view and launch the app.


3. Under "Select appropriate dictionary language", select a base language, that is, a language variant that is in the list and that could be used as the basis to build your new dictionary. In my example, Venezuelan Spanish is not supported, but there are a number of Spanish variants that are in the list, several of which I've added before via this procedure. I will select Mexican Spanish as my base dictionary in this example.


4. Under "Select new dictionary language", select the unsupported language that you need to create a dictionary for. In my example, this will be Venezuelan Spanish.


5. Click Create. You will see a message appear saying that the dictionary has been successfully created. What this means is that a copy of the Mexican Spanish dictionary has been created and labeled Venezuelan Spanish.


6. Close the Hunspell Dictionary Manager app and restart Trados Studio. 

7. Now, the last step is to make sure that you've chosen Hunspell as your spellchecker. To do this, go to Options - Editor - Spelling.


Now your new language variant dictionary is enabled and your previously unsupported language is supported!


Saturday, May 9, 2020

Reorganize your Termbase to Improve Term Recognition in SDL Trados Studio

I first wrote about termbase reorganization in 2013, after the upgrade from SDL Trados Studio 2011 to SDL Trados Studio 2014 alerted users to the need to reorganize termbases.


Seven years later, and almost two years after SDL Trados Studio 2019 first came out, we no longer see this reminder, but may still need to run a termbase reorganization now and then to improve term recognition.

If you've run into a situation where you just know your termbase contains certain terms but are not seeing those terms being recognized, try reorganizing your termbase, it may just be what you need to get things working as they should.


Below are the steps to quickly reorganize your termbases.

1. Open your termbase in Multiterm. 

If you haven't installed Multiterm yet, go to your SDL account, download the program and install it. Once installed, double-clicking a termbase file (*.sdltb) in Windows Explorer will open the termbase in Multiterm.


2. Reorganize the termbase

With the termbase(s) open in Multiterm, go to Termbase Management, make sure the Home tab is selected and click on Reorganize and select the termbases you want to reorganize. Note that you can run the process on several termbases at once.


The reorganization process is pretty fast, so you should be done in only a few minutes, or maybe even seconds, if the termbase is small.


After the process is complete, you can close Multiterm and go back to SDL Trados Studio, where you should start seeing improved term recognition.


Sunday, November 10, 2019

Regular Expressions for Translators: Quantifiers

While character classes allow us to match a variety of characters, quantifiers bring more power to regular expressions by allowing us to specify how many times those characters should be matched.


              Download Nora’s Regular Expressions for Translators Cheat Sheet


Let's add each quantifier to a digit (\d) regex and look at the different results we get in a Find operation in SDL Trados Studio.


Regex: \d

The match for this regex is a single digit, as shown below.


Regex: \d*

Adding the * (zero or more) quantifier to \d gives us a different match: a series of consecutive digits.


However, in SDL Trados Studio, this regex will also match text that is not a digit. Clicking "Find Next" in the example above, causes this regex to match the comma.


Regex: \d+

Adding the + (one or more) quantifier to \d means that the match must have at least one digit.


Clicking "Find Next" here will skip the comma and match the next number group.


Note that this simple regex will match a group of numbers even if they are part of a string containing other characters. Have a look at this example, where I've added the letters AFG to the number 879.


Regex: \d?

Adding the ? (zero or one) quantifier to \d means that the match will be either zero digits or one digit.


Clicking "Find Next" will match each individual character in the segment, including the comma and letters.


Regex: \d{4}

A single number inside curly brackets is a quantifier that indicates that the preceding regex must be matched that exact number of times.


Clicking "Find Next" matches the next four-digit sequence in the segment.


Regex: \d{4,}

A number followed by a comma inside curly brackets indicates that the preceding regex must be matched that exact number of times, or more.


Clicking "Find Next" gives us the following result.


Regex: \d{3,5}

Two numbers separated by a comma (no space) inside curly brackets indicates a range of times that the preceding regex must be matched. In this example, it will be 3, 4 or 5 times.

Running a Find operation with this regex in the active segment below matches the first 3-digit group it finds.


Clicking "Find Next" two more times gives the following results.


Greedy or Lazy?

Quantifiers are greedy by default, which means that they will match as many occurrences of the regex pattern as possible. Consider the example below.

Regex: .+-

The dot character is a wildcard for any character, so this regex will match any character one or more times, as many times as possible (greedy) followed by a dash.

In the active segment below, it looks like there are three instances of groups of characters (numbers) followed by a dash: 614-, 597- and 7855-, but in fact, the first two dashes are interpreted as "any character" due to the use of the greedy quantifier +, which keeps matching "any character" as many times as possible until the last dash is found.


Making the quantifier lazy by adding a ? will cause the expression to recognize the first dash as a dash and not as any character, which results in a different match:


Each of the quantifiers above can be made lazy by adding a ? to it, which will result in the expression being matched as few times as possible.

Finally, while most of the examples above are based on digits, quantifiers can be used with any other regular expressions.


 ¡Pregunta por los precios especiales de SDL Trados Studio para México!


Wednesday, October 30, 2019

Regular Expressions for Translators: Anchors

Have you ever needed to find some text that appears at the beginning or at the end of a segment? How about some text that appears in the middle of a word? Regular expression anchors allow you to do just that.


Here are a few examples where anchors are used to filter segments with SDL Trados Studio's display filter.

First, have a look at the unfiltered text.


In the first example below, I have used a simple regular expression to filter on target segments that have the string "tornillo" at the beginning. Notice that the word "tornillos" is also included, as there is no indication of a word boundary in the regex.


Now, I've filtered to display target segments that end in the word "perno".


The start of segment and end of segment anchors can be used together to enclose the entire contents of the segment, as shown below.


Next, I will use the word boundary anchor, which indicates where a word should start or end. In this example, I'm filtering on the word "tornillo" followed by a word boundary, which means that this won't match the word "tornillos".


When the word boundary anchor is used right before the string "tornill", the filter finds all instances of "tornillo" and "tornillos", but not "atornillada" (segment 4), as the string doesn't appear right after the word boundary in that instance.


The last anchor in the list is the non word boundary anchor. When I use it along with the word "tornillo", I find only instances where the word "tornillos" is found, as the regex means that "tornillo" should not be followed by a word boundary.


Using the non word boundary anchor right before the string "tornill" displays the segment that has the word "atornillada" in it, as the regex indicates that there should not be a word boundary right before "tornill".


As a last example, have a look at this regex that finds source segments that end in the string "bolt", which includes a segment that ends in the word "bolt" and another one that ends in the word "thunderbolt".


If I combine word boundary and end of segment anchors, the filter will display only the segment that ends in the word "bolt", as the word boundary anchors have excluded the word "thunderbolt".


I hope that these simple examples will inspire you to use anchors to find specific text in a variety of use cases. 


 ¡Pregunta por los precios especiales de SDL Trados Studio para México!