Thursday, April 28, 2016

A Beginner's Guide to Creating Custom Dragon Commands for SDL Trados Studio

Let me start by saying that the beginner in the title is me. For the past couple of weeks, I've been learning and experimenting to increase Dragon's usability in Studio, a non-supported application. This will be a summary of what I've learned and a how-to for other users who may want to get started with some basic scripts. If you have no programming experience and feel this is too complicated, believe me when I say that if I've been able to do it, so can you, as my previous experience was limited to creating the odd Word macro, so I basically started from scratch.

I will also be adding some ready-to-use Dragon command scripts for Studio to this post so you can borrow them if you'd like and get up and running in a short time, rather than having to redo many of the things that I and others have done before.

Required Software
What will you need for these commands to work? Custom Dragon commands can only be created or added in the professional version of the software, so at the very least you will need one of the following:

1. Dragon NaturallySpeaking Professional (version 13 and higher if you want to use open-ended commands).

or

2. Dragon NaturallySpeaking Premium (again, version 13 or higher) + KnowBrainer 2016. KnowBrainer is a Dragon add-on that adds command capabilities to any version of Dragon,

or

3. Dragon Professional Individual 14 (this is the latest version of the software, where Premium has been replaced with Professional Individual).

To prepare these commands I have used Dragon Professional Individual 14 + KnowBrainer 2016. It may seem like overkill, as both offer command creation functionality, but KnowBrainer is a much easier to use repository of the Dragon commands, increasing ease-of-use and flexibility. A 30-day trial can be found here.

Creating Custom Commands
Dragon offers four different ways of creating commands. For this post, I will be focusing on the Advanced Scripting option, which is also the only option available in KnowBrainer.

To create a new command, we go to Tools - Add New Command in Dragon or to Add Command (or say "New Command") in KnowBrainer. To clarify: all of these commands can be entered either in Dragon or in KnowBrainer, there's no need to add them to both.

Here are the Dragon and KnowBrainer Command Editor windows, side-by-side.


Dragon scripts are written in Visual Basic, so there are a few things that we need to know to write even the simplest of scripts. An important piece of information is how to enter the names of keys into a script. For example, what to enter if you want Dragon to execute Ctrl+C to copy selected text, or Ctrl+Alt+Right Arrow to select several words to the right of your cursor, or Shift+F3 to change case.

This is done through SendKeys statements, and that's the first thing I had to learn to get started, so that's where we will start.

There is a handy reference of all the keys and modifier keys you will need here:


https://msdn.microsoft.com/en-us/library/aa266279(v=vs.60).aspx
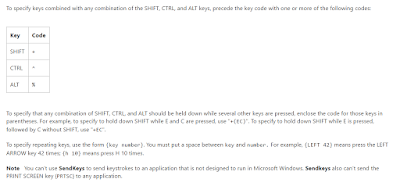
Microsoft's Visual Basic for Applications Reference

Looking at this, we can see that Ctrl+C would be ^C and Ctrl+Alt+Right Arrow would be ^%{RIGHT}, and Shift+F3 would be +{F3}. That's the first step to start converting our Studio shortcuts into scripts. Whatever shortcut we want to emulate would be placed inside a SendKeys statement, like this:

The example above is the command for my Confirm Segment shortcut in Studio, which, as you can see, is Alt+Q. The command can be customized to any shortcut (the key presses used in the script must match the Studio shortcut), and it can be named anything you want. To learn about finding and customizing Studio's shortcuts, Emma Goldsmith has a couple of excellent articles here.

The word(s) in the Command Name field represent what you will say to deploy the command. It's possible to copy the command and give the new copy a different name, so you can deploy the command with any of its alternate names. For example, I have 3 identical Alt+Q commands, called "Confirm", "Continue" and "AltQ". Note that all the user-entered code should be placed between the "Sub Main" and "End Sub" lines.

Notes about the SendKeys statement:
  • This statement sends keystrokes as if they were typed on the keyboard.
  • The syntax is SendKeys "string", where string are the keystrokes to be sent
  • Don't forget to enclose the string in quotation marks. 
  • A keystroke command can be repeated multiple times by adding a number after the key name, for example, {Right 5} would result in the right arrow key being pressed five times.
  • To pause a macro/command until the keys are sent, a comma and a 1 can be added after the end of the SendKeys command, for example SendKeys "^v", 1 means that the macro should wait until the paste operation is completed to proceed.
KnowBrainer offers a very useful feature called VerbalBasic Commands, which means that you can add lines of code by dictating them. Here is the list of some of the SendKeys coding commands:


Sample commands for you to try

As I said earlier, for the commands to work, the shortcut must match what you have in Studio, so if a command doesn't work for you, check your Studio shortcuts and make the appropriate adaptations.

To copy the commands, simply copy and paste the command code making sure your command begins with Sub Main and ends with End Sub. Remember that Sub Main and End Sub are already present when you open a new command window, so make sure not to duplicate them when pasting.

Change the names to whatever you prefer and try out the commands. I have included English and Spanish versions of each command where appropriate, and you will notice that I have not used any accents in the command names in Spanish. That's so that the commands can be added either to Dragon or KnowBrainer, as KnowBrainer doesn't accept accented characters as part of the command name. For other languages, simply change to command name to your own language. If the command contains only shortcuts, it will work in any language. If it's an open-ended command, see the appropriate note below.

If a command name isn't working for you, here's a tip I got from an experienced user: change the name of the command to a single word, for example, change Add tags to segment to Addtagstosegment. That usually does the trick.

Command type: Shortcuts and key presses


Description
English
Spanish
1
Applies tags around selected text

Note: Acronym recognition must be disabled in the TM for this to work properly (otherwise acronyms will be inserted as tags)

The Studio shortcut used here is Ctrl+Alt+Down; replace as needed
Command name: Apply tags

Sub Main
SendKeys "^%{Down}"
SendKeys "{Enter}"
End Sub

Command name: Agregar tags

Sub Main
SendKeys "^%{Down}"
SendKeys "{Enter}"
End Sub

2
Selects the entire segment, adds tags, confirms the segment and goes to the next segment. To be used when there’s only one pair of tags in the segment.

Note: Acronym recognition must be disabled in the TM for this to work properly (otherwise acronyms will be inserted as tags)

The Studio shortcut used here is Ctrl+Alt+Down; replace as needed
Command name: Add tags to segment
  
Sub Main
SendKeys "^a"
Wait .2
SendKeys "^%{Down}"
SendKeys "{Enter}"
Wait .2
SendKeys "^%{Enter}"
End Sub

Command name: Agregar tags a segmento
  
Sub Main
SendKeys "^a"
Wait .2
SendKeys "^%{Down}"
SendKeys "{Enter}"
Wait .2
SendKeys "^%{Enter}"
End Sub

3
Selects the entire segment, copies it to the clipboard, copies source to target (my Studio shortcut is Alt+W), deletes all the text between the tags, pastes the previously cut text between the tags. To be used when there’s multiple tags but all the text is between one pair of tags.

Video demonstration here

Note: Acronym recognition must be disabled in the TM for this to work properly (otherwise acronyms will be inserted as tags)

The Studio shortcut used here is Ctrl+Alt+Down; replace as needed
Command name: Paste with tags

Sub Main
SendKeys "^A"
Wait .1
SendKeys "^X"
Wait .1
SendKeys "%W"
Wait .1
SendKeys "{Right}"
SendKeys "^+D"
Wait .1
SendKeys "^V"
End Sub

Command name: Pegar con tags

Sub Main
SendKeys "^A"
Wait .1
SendKeys "^X"
Wait .1
SendKeys "%W"
Wait .1
SendKeys "{Right}"
SendKeys "^+D"
Wait .1
SendKeys "^V"
End Sub

4
Resets previously used filters
Command name: Reset filters

Sub Main
SendKeys "^%{F6}"
End Sub

Command name: Restablecer filtros

Sub Main
SendKeys "^%{F6}"
End Sub

5
Places the cursor in the Filter text box
Command name: Filter by

Sub Main
SendKeys "^{F6}"
End Sub

Command name: Filtrar por

Sub Main
SendKeys "^{F6}"
End Sub

6
Adds files to the active project
Command name: Add files

Sub Main
SendKeys "%{F12}"
End Sub
Command name: Agregar archivos

Sub Main
SendKeys "%{F12}"
End Sub
7
In the Files view, opens the folder containing the project files
Command name: Explore folder

Sub Main
SendKeys "%+{Enter}"
End Sub
Command name: Explorar carpeta

Sub Main
SendKeys "%+{Enter}"
End Sub
8
Creates a new translation memory
Command name: New memory

Sub Main
SendKeys "%+N"
End Sub
Command name: Nueva memoria

Sub Main
SendKeys "%+N"
End Sub
9
Removes all the TMs from the project

Command name: Remove all TMs

Sub Main
SendKeys "^%+M"
End Sub

Command name: Quitar todas las memorias

Sub Main
SendKeys "^%+M"
End Sub

10
Activates the Files view
Command name: Files view

Sub Main
SendKeys "%+F"
End Sub

Command name: Vista archivos

Sub Main
SendKeys "%+F"
End Sub
11
Toggles track changes
Command name: Enable track changes

Sub Main
SendKeys "^%{F10}"
SendKeys "{Esc}"
End Sub

Command name: Activar track changes

Sub Main
SendKeys "^%{F10}"
SendKeys "{Esc}"
End Sub

12
Toggles track changes
Command name: Disable track changes

Sub Main
SendKeys "^%{F10}"
SendKeys "{Esc}"
End Sub

Command name: Desactivar track changes

Sub Main
SendKeys "^%{F10}"
SendKeys "{Esc}"
End Sub

13
Selects text from the cursor to the end of the segment
Command name: Select to end of segment
  
Sub Main
SendKeys "^+{PgDn}"
End Sub

Command name: Seleccionar hasta fin de segmento
  
Sub Main
SendKeys "^+{PgDn}"
End Sub

14
Selects text from the cursor to the beginning of the segment
Command name: Select to beginning of segment
  
Sub Main
SendKeys "^+{PgUp}"
End Sub
Command name: Seleccionar hasta inicio de segmento
  
Sub Main
SendKeys "^+{PgUp}"
End Sub
15
Presses the Escape key
Command name: Escape
  
Sub Main
SendKeys "{Esc}"
End Sub
Command name: Escape
  
Sub Main
SendKeys "{Esc}"
End Sub
16
Changes the selected text’s case (note this cycles through lowercase, title case and uppercase)
Command name: Uppercase
  
Sub Main
Sendkeys "+{F3}"
End Sub
Command name: Mayusculas
  
Sub Main
Sendkeys "+{F3}"
End Sub
17
Changes the selected text’s case (note this cycles through lowercase, title case and uppercase)
Command name: Title case
  
Sub Main
Sendkeys "+{F3}"
End Sub
Command name: Mayusculas titulo
  
Sub Main
Sendkeys "+{F3}"
End Sub
18
Changes the selected text’s case (note this cycles through lowercase, title case and uppercase)
Command name: Lowercase
  
Sub Main
Sendkeys "+{F3}"
End Sub
Command name: Minusculas
  
Sub Main
Sendkeys "+{F3}"
End Sub
19
Displays recognized terms from the active termbases

Video demonstration here
Command name: Display terms
  
Sub Main
SendKeys "^+L"
End Sub
Command name: Mostrar terminos
  
Sub Main
SendKeys "^+L"
End Sub
20
Presses the right arrow key once
Command name: Right arrow
  
Sub Main
Sendkeys "{Right}"
End Sub
Command name: Flecha derecha
  
Sub Main
Sendkeys "{Right}"
End Sub
21
Presses the right arrow key three times
Command name: Right arrow 3
  
Sub Main
Sendkeys "{Right 3}"
End Sub
Command name: Flecha derecha 3
  
Sub Main
Sendkeys "{Right 3}"
End Sub
22
Deletes all the text between the cursor position and the next tag
Command name: Delete until tag
  
Sub Main
SendKeys "^+D"
End Sub
Command name: Borrar hasta tag
  
Sub Main
SendKeys "^+D"
End Sub
23
Selects the entire active segment
Command name: Select segment
  
Sub Main
SendKeys "^a"
End Sub

Command name: Seleccionar segmento
  
Sub Main
SendKeys "^a"
End Sub

24
Removes all the tags from the segment
Command name: Remove tags
  
Sub Main
SendKeys "^%{Space}"
End Sub
Command name: Borrar tags
  
Sub Main
SendKeys "^%{Space}"
End Sub
25
Inserts opening and closing question marks and places the cursor between them

Command name: Pregunta
  
Sub Main
SendKeys "¿?{Left}"
End Sub
26
Clears the target segment
Command name: Clear segment
  
Sub Main
Sendkeys "%{Del}"
End Sub
Command name: Borrar segmento
  
Sub Main
Sendkeys "%{Del}"
End Sub
27
Adds html underlining tags around the selected text
Command name: U around
  
Sub Main
SendKeys "^c"
SendKeys "<u>"
SendKeys "^v"
SendKeys "</u>"
Wait .3
SendKeys "{Right}"
End Sub
Command name: Rodearu
  
Sub Main
SendKeys "^c"
SendKeys "<u>"
SendKeys "^v"
SendKeys "</u>"
Wait .3
SendKeys "{Right}"
End Sub
28
Displays tags without text
Command name: No tag text
  
Sub Main
Sendkeys "%VN"
End Sub

Command name: Tags no texto
  
Sub Main
Sendkeys "%VN"
End Sub

29
Displays tag ID numbers
Command name: Tag ID
  
Sub Main
Sendkeys "%VT4"
End Sub
Command name: Tags con numeros
  
Sub Main
Sendkeys "%VT4"
End Sub
30
Opens the Options dialog
Command name: Options
  
Sub Main
Sendkeys "{F2}"
End Sub
Command name: Opciones
  
Sub Main
Sendkeys "{F2}"
End Sub
31
Copies source to target and confirms the segment

(Custom Studio shortcuts: Alt+W copy source to target; Alt+Q confirm segment)
Command name: Copy and confirm
  
Sub Main
Sendkeys "%W"
Wait .1
Sendkeys "%Q"
End Sub
Command name: Copiar y confirmar
  
Sub Main
Sendkeys "%W"
Wait .1
Sendkeys "%Q"
End Sub
32
Removes the period (or any other character) at the end of a segment
Command name: Segmento no period
  
Sub Main
SendKeys "^{PgDn}"
SendKeys "{Backspace}"
End Sub

Command name: Segmento sin punto
  
Sub Main
SendKeys "^{PgDn}"
SendKeys "{Backspace}"
End Sub
33
Adds a period at the end of a segment
Command name: Segment period
  
Sub Main
SendKeys "^{PgDn}"
SendKeys "."
End Sub

Command name: Segmento con punto
  
Sub Main
SendKeys "^{PgDn}"
SendKeys "."
End Sub


Command type: Open-ended

This is a very powerful Dragon feature that allows you to add your own text to a command.

When naming an open-ended command, the <dictation> part of the name cannot be typed or pasted, it must be selected from a list. This is because open-ended commands are a type of List Commands, which I will discuss at a later time.

Do the following when creating an open-ended command:

In Dragon


In KnowBrainer

There should be no spaces between the command name and the <dictation> part of the name.

Special note about open-ended commands in languages with special non-English characters: To avoid issues with accented characters being dropped, for example, “construcción” being written out as “construccin”, all Spanish open-ended commands (those including <dictation> in the name) must be entered directly in Dragon, not in KnowBrainer, and must use SendDragonKeys ListVar1 instead of SendKeys ListVar1. See the examples below.


34
Selects the text dictated as part of the command. For example, say “Select supervisor”, to select the word “supervisor”.


Command name: Select <dictation>
  
Sub Main
SendKeys "^{PgUp}"
SendKeys "^f"
SendKeys ListVar1
Wait .1
SendKeys "{Enter}"
Wait .1
SendKeys "{Esc}"
End Sub

Command name: Seleccionar <dictation>
  
Sub Main
SendKeys "^{PgUp}"
SendKeys "^f"
SendDragonKeys ListVar1
Wait .1
SendKeys "{Enter}"
Wait .1
SendKeys "{Esc}"
End Sub

35
Performs a search in the active document, starting at the top
Command name: Find <dictation>

Sub Main
SendKeys "^{Home}"
Wait .5
SendKeys "^f"
Wait .1
SendKeys ListVar1
Wait .5
SendKeys "{Enter}"
Wait .2
SendKeys "{Esc}"
End Sub
Command name: Buscar <dictation>

Sub Main
SendKeys "^{Home}"
Wait .5
SendKeys "^f"
Wait .1
SendDragonKeys ListVar1
Wait .5
SendKeys "{Enter}"
Wait .2
SendKeys "{Esc}"
End Sub
36
Places the cursor before the dictated word
Command name: Insert before <dictation>

Sub Main
SendKeys "^{PgUp}"
SendKeys "^f"
SendKeys ListVar1
Wait .1
SendKeys "{Enter}"
Wait .1
SendKeys "{Esc}"
Wait .1
SendKeys "{Left}"
End Sub

Command name: Insert before <dictation>

Sub Main
SendKeys "^{PgUp}"
SendKeys "^f"
SendDragonKeys ListVar1
Wait .1
SendKeys "{Enter}"
Wait .1
SendKeys "{Esc}"
Wait .1
SendKeys "{Left}"
End Sub

37
Places the cursor after the dictated word
Command name: Insert after <dictation>

Sub Main
SendKeys "^{PgUp}"
SendKeys "^f"
SendKeys ListVar1
Wait .1
SendKeys "{Enter}"
Wait .1
SendKeys "{Esc}"
Wait .1
SendKeys "{Right}"
SendKeys "{Space}"
End Sub

Command name: Insert after <dictation>

Sub Main
SendKeys "^{PgUp}"
SendKeys "^f"
SendDragonKeys ListVar1
Wait .1
SendKeys "{Enter}"
Wait .1
SendKeys "{Esc}"
Wait .1
SendKeys "{Right}"
SendKeys "{Space}"
End Sub

38
Deletes the text dictated as part of the command
Command name: Delete <dictation>
  
Sub Main
SendKeys "^{Home}"
Wait 0.5
SendKeys "^f"
Wait 0.1
SendKeys ListVar1
Wait .5
SendKeys "{Enter}"
Wait 0.2
SendKeys "{Esc}"
Wait 0.5
SendKeys "{Del}"
Command name: Borrar <dictation>
  
Sub Main
SendKeys "^{Home}"
Wait 0.5
SendKeys "^f"
Wait 0.1
SendDragonKeys ListVar1
Wait .5
SendKeys "{Enter}"
Wait 0.2
SendKeys "{Esc}"
Wait 0.5
SendKeys "{Del}"
39
Copies the text dictated as part of the command to the clipboard
Command name: Copy <dictation>
  
Sub Main
SendKeys "^{PgUp}"
Wait 0.5
SendKeys "^f"
Wait 0.1
SendKeys ListVar1
Wait .5
SendKeys "{Enter}"
Wait 0.2
SendKeys "{Esc}"
Wait 0.5
SendKeys "^c"
End Sub
Command name: Copiar <dictation>
  
Sub Main
SendKeys "^{PgUp}"
Wait 0.5
SendKeys "^f"
Wait 0.1
SendDragonKeys ListVar1
Wait .5
SendKeys "{Enter}"
Wait 0.2
SendKeys "{Esc}"
Wait 0.5
SendKeys "^c"
End Sub
40
Pastes the contents of the clipboard before the text dictated as part of the command 
Command name: Paste before <dictation>
  
Sub Main
SendKeys "^{PgUp}"
Wait 0.5
SendKeys "^f"
Wait 0.1
SendKeys ListVar1
Wait .5
SendKeys "{Enter}"
Wait 0.2
SendKeys "{Esc}"
Wait 0.5
SendKeys "{Left 2}{Space}"
Wait 0.5
SendKeys "^v"
End Sub
Command name: Pegar antes de <dictation>
  
Sub Main
SendKeys "^{PgUp}"
Wait 0.5
SendKeys "^f"
Wait 0.1
SendDragonKeys ListVar1
Wait .5
SendKeys "{Enter}"
Wait 0.2
SendKeys "{Esc}"
Wait 0.5
SendKeys "{Left 2}{Space}"
Wait 0.5
SendKeys "^v"
End Sub
41
Pastes the contents of the clipboard after the text dictated as part of the command 
Command name: Paste after <dictation>
  
Sub Main
SendKeys "^{PgUp}"
Wait 0.5
SendKeys "^f"
Wait 0.1
SendKeys ListVar1
Wait .5
SendKeys "{Enter}"
Wait 0.2
SendKeys "{Esc}"
Wait 0.5
SendKeys "{Right}{Space}"
Wait 0.5
SendKeys "^v"
End Sub
Command name: Pegar despues de <dictation>
  
Sub Main
SendKeys "^{PgUp}"
Wait 0.5
SendKeys "^f"
Wait 0.1
SendDragonKeys ListVar1
Wait .5
SendKeys "{Enter}"
Wait 0.2
SendKeys "{Esc}"
Wait 0.5
SendKeys "{Right}{Space}"
Wait 0.5
SendKeys "^v"
End Sub
42
Cuts the text dictated as part of the command and places it in the clipboard
Command name: Cut <dictation>
  
Sub Main
SendKeys "^{PgUp}"
Wait 0.5
SendKeys "^f"
Wait 0.1
SendKeys ListVar1
Wait .5
SendKeys "{Enter}"
Wait 0.2
SendKeys "{Esc}"
Wait 0.5
SendKeys "^x"
End Sub
Command name: Cortar <dictation>
  
Sub Main
SendKeys "^{PgUp}"
Wait 0.5
SendKeys "^f"
Wait 0.1
SendDragonKeys ListVar1
Wait .5
SendKeys "{Enter}"
Wait 0.2
SendKeys "{Esc}"
Wait 0.5
SendKeys "^x"
End Sub

While all these commands are simple to implement, they significantly increase the functionality of Dragon in Studio and allow us not only to achieve text control, but application control as well.

In a future post, I will write about List Commands, a powerful way of consolidating commands with several variables into one.


Tuesday, April 12, 2016

Dragon Professional Individual 14 and Studio: What will you say?

While not every project is dictation-friendly, speech recognition can undoubtedly be a valuable tool for a translator. For several years now, I have used Dragon products in combination with SDL Trados Studio with varying degrees of success. While Dragon NaturallySpeaking never worked flawlessly with Studio, it wasn't until DNS version 13 that I lost practically all of the already limited text control capabilities in Studio.

What do I mean by text control? In fully compatible applications, such as Microsoft Word, it is possible to select, format, edit, correct and move text by voice using Dragon's built-in "select-and-say" commands. The video below briefly illustrates the use of full text control in MS Word.


In non-supported applications, such as Studio, however, select-and-say commands are not available. Compare what happens in Word, above, to what happens in Studio, below.


Dragon and Studio: A match not made in heaven
In addition to the lack of full text control, the interaction between Dragon and Studio (particularly Studio 2014) has been plagued with little problems, such as the need to dictate the initial cap command for every segment, which is no longer an issue thanks to Studio 2015's autocorrect capability. For a while, Dragon would insert extra blank spaces at the beginning of segments or just before any newly inserted text. It also dropped spaces, clumping words together here and there, and had a major conflict with Studio's AutoSuggest when Studio 2015 first came out. Some of these issues were annoying enough that I many times abandoned any attempts to dictate translations and went back to typing, which is disappointing, particularly because Dragon's accuracy, even without prior training, is quite high, and has been for the past few releases. I usually dictate in Spanish, my main target language, but I own the bilingual version of Dragon, where I can dictate either in English or in Spanish (a separate profile is created for each language), and even in my second language, English, Dragon does a superb job recognizing my non-native speech. (This post has been dictated with Dragon, with very minimal correction needed).

DPI 14: The new and improved Dragon
The product that I use used to be called Dragon NaturallySpeaking Premium, but in its latest iteration it underwent a name change and it is now called Dragon Professional Individual, a name that provides a hint to one major, very useful enhancement: In addition to improved accuracy and better recognition with laptop microphones, as well as improved stability, Dragon Professional Individual 14 includes the full custom command creation capability that used to be available only in the more expensive professional versions of Dragon NaturallySpeaking.


There are four methods that can be used to create commands:

1. Auto-Text, which provides basic insertion of text and graphics

2. Macro Recorder, which records mouse and keyboard actions in real time, and, unfortunately, deploys them in real time as well, although things can be sped up a bit by deleting parts of the recorded macro, such as mouse movements.

3. Step-by-step, a very easy way of creating commands for keyboard shortcuts, for example.

4. Advanced Scripting, which uses Visual Basic to create more complex, but also more robust, commands.

Commands can be global, application-specific, and even window-specific.

DPI 14's Command Creation window

10 custom DPI 14 commands for Studio

How well does it work? Amazingly well. I upgraded to DPI 14 a few days ago and after starting with a few basic Step-by-Step commands, I have been learning about and creating Advanced Scripting commands. So far, I have managed to create over 50 custom commands for Studio, some of which simply activate existing Studio shortcuts, and some others which manage more complex action sequences.

Here are a few examples:

What I say
What happens
Notes
Confirm
The active segment is confirmed

Select <dictation>
Selects the dictated text within the active segment

Apply tags
Tags are added to the selected text
Works best when acronym recognition is disabled in the TM
Enable track changes (or Disable track changes)
Toggles track changes
Since this is a toggle shortcut, I’ve simply saved the same command with two different names
Show repetitions
Applies the display filter to show Repetitions – All

Show numbers only
Applies the display filter to show Numbers Only

Show untranslated
Applies the display filter to show Not Translated

Reset filters
Clears all the settings in the display filter

Select to end of segment
Selects all the text from the cursor to the end of the active segment

Insert after <dictation>
Selects the dictated text and places the cursor right after for new text insertion


To see the commands in action in Studio, have a look at the video below. Note how towards the end of the clip I try to say "Delete" to delete some unwanted text, but instead Dragon inserts the word "delete" into the segment, as there is no "Delete" command (actually, there is, but it only works in supported applications). A new custom command, which should take less than a minute to create, will take care of this.

Custom Dragon commands for Studio in action

KnowBrainer: A Dragon add-in for quick command creation
I'd like to finish this post by saying that while all these commands can be created in Dragon, I'm using a powerful add-in called KnowBrainer, which essentially allows you to create Dragon commands quickly, and comes pre-loaded with hundreds of ready-made global commands that can be used right out of the box or can serve as inspiration for more custom commands. An additional advantage I find in using KnowBrainer is that I can keep all my English and Spanish commands in one place. To make a command available in both languages, all I need to do is make a copy and give it a name in the appropriate language. While you can also have commands in both languages stored within Dragon, since you have to switch profiles to switch languages, only the commands that match the language in the active profile are loaded. Lastly, the creators of KnowBrainer host a very active, wonderful speech recognition forum where help and tips can be found both for Dragon and KnowBrainer.

The KnowBrainer sidebar, showing my English and Spanish custom Studio commands.

The KnowBrainer Command Editor window for Advanced Scripting (Visual Basic) commands


So, no more frustration and no more setting Dragon aside for days at a time. With this new version, Dragon has opened the door to new possibilities to make speech recognition a regular part of my workday.


Monday, March 7, 2016

An Excel-Based Terminology Provider for SDL Trados Studio: The TermExcelerator

With the release of SDL Trados Studio 2015 SR2, there is an exciting new addition: the TermExcelerator, available from the SDL Open Exchange.

This new terminology provider is a plug-in that allows the user to use an Excel glossary as a termbase in Studio. It couldn't be easier or more convenient. Once the Excel termbase has been added to Studio, terms can be added, edited or deleted either in Studio or in Excel, making termbase maintenance a breeze.

Let's have a look at how it works.

The basics
The TermExcelerator works only with one target language, so it's not intended for multilingual termbases. In addition to the source and target column, the Excel file can have a third column called "Approved column" in the provider. This can be used for notes and comments or any other relevant information.

Adding an Excel glossary directly to Studio
An Excel termbase is added the same way as a Multiterm termbase. After installing the plug-in, Studio will offer an option to add an "Excel-based Terminology provider" in addition to the usual Multiterm termbases.

The screenshot below shows the Project Settings route, used for adding termbases to existing projects. Termbases can also be added via Options (the termbase will be added to all new projects created thereafter and to single-document workflows) and when creating a new project.

Notice the redesigned Termbase pane above, which now resembles the layout of the Translation Memory pane.

Selecting to add an Excel-based terminology provider takes us to the Settings window.


For reference, here's the glossary I've added to this example.


After clicking Submit, the Excel glossary has now been added to my project.


When I close this window with OK and go back to the Editor view, I can see that the termbase is now active.


Once the termbase has been loaded, term recognition and search work as usual.


Editing and maintaining the Excel termbase

The TermExcelerator offers some interesting features: in addition to the regular Add New Term and Quick Add New Term functionality from within the Studio Editor, we can delete and add entries from the Termbase Viewer, and sync changes between the Excel file and the termbase in Studio.

Adding Terms
To add a new term to our Excel termbase from the Studio Editor view, simply select the source and target terms, right click and select Add New Term or Quick Add New Term. Either option will automatically save the newly added term to the Excel file.

Tip: To enter terms quickly via the keyboard, set a shortcut in Options - Keyboard Shortcuts - Editor 
for the Quick Add New Term feature.


The new term has been added to the Excel termbase.

We can also add a term by clicking the Add button in the termbase viewer and entering the new term manually.


One of the most convenient features of the TermExcelerator is that we can now quickly add multiple terms to the Excel file and, by clicking Sync in the Termbase Viewer, they will become immediately available in Studio. (Note: The Excel file must be saved and closed before syncing).

Here, I've added the terms in rows 9-13 in Excel.

When I click Sync in the Termbase Viewer, the newly-added terms become available in Studio.

Deleting and editing terms
The steps to delete and edit terms are pretty straightforward. The Delete button in the Termbase Viewer is used to remove the selected entry, while selecting and double-clicking an entry allows us to edit its contents. The Save Entry button should be used to save any changes after editing. Of course, entries can also be deleted or edited in Excel, and after Syncing, the updated termbase will be immediately available in Studio.

Data integrity
The usual warnings for data integrity apply, and it's always a good idea to make a copy of the Excel file just in case something goes wrong.

Final thoughts
Although I don't see myself abandoning my Multiterm termbases any time soon, I appreciate the benefits and convenience of this great new tool, which has quickly become an essential component of my toolbox.

For more details, don't miss Paul Filkin's post on the TermExcelerator: Committing the cardinal sin... 

Friday, January 15, 2016

Removing Duplicates from a Multiterm Termbase

Duplicates in a Multiterm termbase can clutter up the term recognition list in Studio and make files larger than they need to be, so it makes sense to keep our termbases as duplicate-free as possible. Here's a quick and easy how-to for termbase maintenance.

Step 1. Convert the termbase to an Excel file

The easiest and fastest way to do this is to use the Open Exchange Glossary Converter app. It's a simple matter of dragging and dropping the termbase onto the app, and just like that, an Excel file will be created in the same folder where the exported termbase is stored.


Step 2. Remove duplicates in Excel

Open the converted file in Excel, and go to Data - Data Tools - Remove Duplicates. Excel will tell you how many duplicates were removed and how many entries are still left.


Step 3. Convert the Excel file back to a termbase

Once again, drag and drop the file (the Excel file this time) onto the Glossary Converter and let it work its magic. You can either overwrite the existing termbase or save it under a new name.


And that's all there is to it. The whole process doesn't take more than a few minutes. Of course, all the standard data back-up warnings apply, and it's advisable to make a copy of the termbase before starting the process, just in case.

Thursday, January 14, 2016

Why Mats Linder's SDL Trados Studio 2015 Manual will be the first book I will read this year

We're still in the first month of 2016, so I'm working on one of my resolutions: Reading Mats Linder's SDL Trados Studio 2015 Manual cover to cover (all 508 pages of it!) before January 31st.

I decided to do this for three reasons:

1. I always like to start a new year by reading a self-improvement book. I usually pick something to do with personal development, but for this year it will be something to do with skill development.

2. I recently heard a world-famous surgeon say that the reason he has become an expert in his field is that he has picked certain techniques and stuck with them, studying them and developing and honing his craft, rather than jumping from approach to approach, just scratching the surface of new knowledge. This resonated with me: I should invest more time to learn as much as I can about the tools I use every day, and one of those tools is Studio.

3. I find that the SDL Trados Studio 2015 Manual is well written and organized, and it's very comprehensive. Whenever I want to learn more about a Studio feature, I usually go to Studio's help first, then I refer to Mats' Manual, and when I do that I always find more information, unrelated to what I was looking for but just as interesting and I often think "I need to read this later", and then I never find the time to do it, so this is my chance to read it all.

To illustrate, here are 3 examples of information I wasn't looking for at the time but I found very useful after coming upon it in Mats' manual:

1. Using the AnyTM feature to add an automated translation provider, such as Google Translate or SDL Language Cloud as "any other translation provider" rather than as a file-based TM means that language direction doesn't matter (page 102). This is interesting, as I had seen the feature and had wondered what would be the point of adding Google Translate via AnyTM.

2. Multiple AutoText entries can be added at once by opening the file in a text editor and simply adding the entries there (page 243), then importing it. I had actually thought about this but reading about it in the manual motivated me to go and try it.

3. In the Word List settings under QA, the correct form of the word doesn't have to be specified along with the wrong form. Including it will only mention it in the error message (page 284) but will have no other effect. I knew the correct form was listed in the error message, but didn't realize a wrong word could be included in the list without the correct form.

Something that I really like about Mats' Manual is that it's full of tips and hints that go beyond Studio and include Open Exchange apps, which are not mentioned just in passing, but rather include his own views about the usefulness of the apps and even instructions to use them, as is the case for example with these great apps: TermInjector (page 244) and the Glossary Converter/Glossary Plugin (page 388). There are also sections about third-party software, such as AutoHotkey and PhraseExpress. Mats also references blogs with how-tos to help the reader expand their understanding of Studio's features.

I realize this cover-to-cover approach to reading a reference manual may be unorthodox, and, some may say, even pointless, but I am finding it very satisfying. I'm reading some sections faster than others, depending on how familiar I am with the features being explained, and I'm bookmarking things for future reference as I go along. I just hope I will be done with all 500+ pages before a new version comes out!


Friday, December 11, 2015

Segmentation Exceptions in SDL Trados Studio

In addition to creating custom segmentation rules, Studio allows us to add exceptions to new or existing rules. This post will explain how to do just that in Studio 2015.

A sample use case

In the example below, the translation for "Made in China" will propagate from segment 2 to segment 4, but this is not desirable in Spanish, as the verb needs to be singular in segment 2 and plural in segment 4, a distinction that exists in Spanish but not in English. Furthermore, there is gender to be taken into account, which in this case doesn't matter, but in other segments will make a difference.


Adding an exception to a segmentation rule

Segmentation rules are modified in each TM's settings. For this example, we will go to Project Settings - Language Pairs - All Language Pairs - Translation Memory and Automated Translation, select the appropriate TM and click Settings, then Language Resources - Segmentation Rules.


I will then select the Colon rule and click Edit.

At the bottom of the Edit Segmentation Rule window, select the Add button next to the Exceptions pane, and then the Advanced View button in the window that opens, to get to the Add Rule Exception window.


This is where we will tell Studio when NOT to segment after a colon, so let's keep our source text in mind to make sure we don't miss anything.

Battery: Made in China
Batteries: Made in China

I want Studio to ignore the colon segmentation rule whenever it comes across the phrase "Made in". The part that I need to change in the rule is what comes after the break, that is, when "Made in" appears after a colon, the colon rule should be skipped. It looks simple enough, but there is one little thing to keep in mind: there is also a space after the colon, and if I don't add that, the exception won't work. So what I really need is for the colon segmentation rule to be ignored when "space + Made in" is found after a colon.

\s represents any whitespace in regular expressions, and it's already included in the "After break" pane as shown above, so I just need to add "Made in" right after it.


After clicking OK, I see that the exception has now been added to the rule.


After closing all the open windows, it's time to process the file with the new segmentation. If my file had been added to my project before adding the exception, I will need to remove it, add it back and reprocess it for the exception to take effect.

And here's the resulting segmentation, just what I needed!


This example uses simple text content for the exception, but with regular expressions, even more powerful exceptions can be added to fit a variety of scenarios.