Wednesday, October 23, 2019

Regular Expressions for Translators: Escaping Metacharacters


If you’ve ever attempted to use a question mark or an asterisk in SDL Trados Studio’s display filter, you may have been surprised to get an error message that looks like this:


In fact, several of the characters below will trigger this message, while others will simply return unwanted results. 


You can test this by creating a simple Word file that contains these characters, opening it in Studio and attempting to filter using each character. I’ve indicated the results you’ll get below.


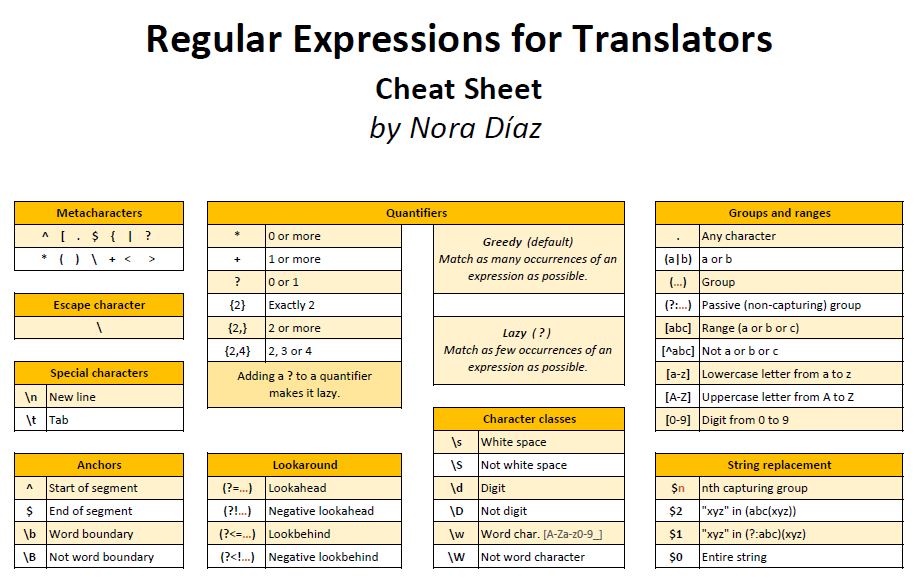
Why is this? Because the display filter has regular expressions enabled by default, and all of these characters have special meanings when creating regular expressions. To learn more about the meaning of each character, have a look at my Regular Expressions for Translators Cheat Sheet.


So, does this mean you can’t use any of these characters in the display filter? Not exactly. All you need to do is “escape” each of these characters whenever you want them to be matched literally. You actually do this by using one of those metacharacters: the backslash.


The screenshot below shows that after escaping the question mark character in the display filter, there is no error message and the filter is properly applied, displaying only the segments that contain a question mark.


Metacharacters that don’t need to be escaped

As you may have inferred from the test above, there are three metacharacters that don’t really need to be escaped: {, < and >. This is because their special meaning only applies when they are used in very specific ways. However, while it may be important for a computer programmer writing code to avoid escaping metacharacters when it's not required, for a linguist looking to quickly filter content while translating, editing or proofreading this is not so critical, so if it’s hard to remember which metacharacters to escape and which not to, simply escape them all.


Final notes 
  • SDL Trados Studio uses the .NET regex flavor
  • While regular expressions are the default for the regular display filter in SDL Trados Studio, they are optional in the Advanced Display Filter and in the Community Advanced Display Filter
  • Escape sequences can be used in Find operations but not in Replace patterns 
  • To match a literal backslash, use another backslash to escape it: \\


 ¡Pregunta por los precios especiales de SDL Trados Studio para México!


Wednesday, July 3, 2019

Create Your Own Macros with AutoHotkey

While AutoHotkey is a powerful tool that can be used to automate tasks in any program, in this article, aimed at translators, I will use examples of applications in SDL Trados Studio, simply because that's my main CAT tool. Hopefully, however, the basic principles explained here can be easily transferred to any other program.

Let's start with an example of what AutoHotkey can help us achieve. Let's say that we often need to copy source to target and then confirm the segment.

This usually requires two steps:

                                                1. Copy source to target: Ctrl + Insert
                                                2. Confirm segment: Ctrl + Enter

What if we could combine them into a single shortcut? This AutoHotkey script will allow us to do just that. By pressing Alt+e, the Ctrl+Insert and Ctrl+Enter steps will be executed.

                        !e::
                        Send ^{Insert}
                        Sleep 200
                        Send ^{Enter}
                        Return

By looking at the information above and then the script, you can quickly figure out the following:

  • "!" represents the Alt key
  • "^" represents the Control key
  • Key names need to be enclosed in curly brackets when they are in the body of the script
  • The "Send" command is used for key presses
  • A "Sleep" command is used to wait between executing the steps (in this case 200 ms) 
  • The "Return" command indicates the end of the script

The first line in the script (!e::) is the hotkey, or shortcut, that we will use to trigger the actions in the script. Hotkeys are selected by the user and must always end with a double colon.

How do I get started?

Follow the steps below to create your first AutoHotkey script.

1. Download AutoHotkey (www.autohotkey.com) and install it. Once installed, you won't see anything happen, that's normal. AutoHotkey runs in the background and allows you to run your own scripts (macros).

2. Go to a folder in Windows Explorer where you would like to save your script. I have a folder called AutoHotkey Scripts just to keep them all in one place. Right-click on an empty space in the folder and select New-AutoHotkey Script. Give a name to your script and save it. The extension of an AutoHotkey script file is ahk.

So far, you have the empty "skeleton" of a script. Now you need to enter the actions you want it to execute.

3. Right-click on the script and select Open, then open it with a text editor, such as Notepad (I prefer Notepad++, available for free).

4. Once the file is open, you will see that there's already four lines of code in it. Enter your script code in a new line, below the existing code.


Note that I've added a directive in line 6 (#IfWinActive ahk_exe SDLTradosStudio.exe). This tells AutoHotkey that this hotkey is only valid in SDL Trados Studio. Otherwise, Alt+e would trigger Ctrl+Insert followed by Ctrl+Enter in every program on my computer.

5. Save the file. Now go to the folder where the file is saved, and double-click the file. This will load the script. Look for a green square with a white H in it in your system tray, which indicates that the script is active.

6. Now that the script is active, go to SDL Trados Studio, press Alt+e in the target column of a segment, and see what happens!

Adding scripts to an existing file

Now that we understand the basics of AutoHotkey, let's add more scripts/macros to our file.

A single ahk file can contain a single script or multiple scripts. Here we will add a second script to the same file we have just created.

The IfWinActive directive applies to all the scripts below it, so no need to add it again. With the file open in Notepad++, we will just go to line 14 and start adding the new script there.

For the second example, I suggest we add a script that deletes everything from the position of the cursor to the end of the segment.

To accomplish this, we would need the following steps:

1. Press Control+Shift+Page Down
2. Press Delete

In the following key list, we can see the names of the keys we need.


Download a PDF version of the key list here.

I will use Control+d as the hotkey/shortcut for this new script, so it will look like this:


After adding the new code and saving the file, I need to reload it for the new script to become available. I can do this either by double-clicking on the file in Windows Explorer, or by right-clicking on the green square AutoHotkey icon in the system tray and then selecting "Reload This Script".


To test the new script, go to SDL Trados Studio, place your cursor in the middle of some target text and press Ctrl+d. Doesn't that feel like magic?

While there's a lot more to AutoHotkey than the simple explanation included here, hopefully these basic steps will get you started to create your own macros for repetitive actions.

Resources
  • The AutoHotkey forum in the SDL Community has lots of scripts shared by fellow translators that are ready to use. That's also a great place to ask for help with your own scripts.
  • The AutoHotkey documentation can be a bit overwhelming for new users, but that's the place to find everything you could possibly want to know about AutoHotkey.
  • Paul Filkin's blog, Multifarious, has some great articles on AutoHotkey. 
  • If you read Spanish, be sure to check out Jesus Prieto's blog, Gonduana, where you will find lots of detailed information about AutoHotkey.







Wednesday, January 9, 2019

SDL Trados Studio Quick Tips: Using TMX Content in Trados Studio

If you have translation memories in TMX format that you'd like to use in SDL Trados Studio, this is how you can do it.

Option 1 - TMX imported into an existing translation memory

If you already have a Trados Studio translation memory (*.sdltm) that you would like to add the contents of the TMX file to, you can import the file by following one of the procedures below.

a. In the Translation Memories view, open your existing translation memory, and click Import, then follow the steps needed to select your TMX file.


b. If your TM is active in a project, you can also start the import process from Project Settings - All Language Pairs - Translation Memories and Automated Translation.


Option 2 - New translation memory created from TMX file

If you would like to create a completely new TM from your TMX file, you can directly "open" the TMX in SDL Trados Studio. This will automatically convert the TMX to a Trados TM, by first creating the TM and then importing the TMX into the newly created TM.

a. From the Translation Memories view, select Open, and select *.tmx from the file type dropdown list.


b. The same procedure can be launched from Project Settings - All Language Pairs - Translation Memories and Automated Translation by selecting Use - File-Based Translation Memory. When this is done from Project Settings, the TM will be added to the active project.


SDL Trados Studio Quick Tips: Removing Day Names from Autolocalized Dates

SDL Trados Studio by default adds the name of the day to autolocalized dates. If you want to change this setting, do one of the following:

For an existing project*, go to Project Settings - Language Pairs - Your Specific Language Pair - Translation Memory and Automated Translation - Auto-substitution - Dates and Times and select your preferred date format from the Long date options.


For the change to be implemented in future projects, created after the setting is changed*, go to Options - Language Pairs - Your Specific Language Pair - Translation Memory and Automated Translation - Auto-substitution - Dates and Times and select your preferred date format from the Long date options.

*Keep in mind that changes made in Options will only be applied to future files and projects created by you. For any existing projects or future projects received from someone else, for example, a package, the change needs to be made in Project Settings.

Tuesday, January 8, 2019

SDL Trados Studio Quick Tips: Changing the Font Size in the Editor

To increase or decrease the font size in the Editor, do one of the following:

In the View tab, go to the far right and use the Font Adaptation icons to increase or decrease the font size dynamically with every click. The Adapt Font Sizes button has to be enabled as shown below for this to work.


Alternatively, go to Options - Editor - Font Adaptation and enter your preferred font sizes there.


And that's all there is to it!


SDL Trados Studio Quick Tips: Changing the Default Language

If you keep seeing the following when opening a new document for translation and your target language is not German, you may want to change this setting.


To change the default language in SDL Trados Studio 2019, go to File - Options - Editor - Languages, and select your preferred default language.


And that's all there is to it!

Monday, November 19, 2018

Automatically Closing the Outlook Window when Creating Packages in SDL Trados Studio

If, like me, you find it annoying to have the Outlook window popping up whenever you create a package after opening SDL Trados Studio, then you may find this useful.

This workaround uses an AutoHotkey script, so if you are not currently an AutoHotkey user, read the section at the end of this article for detailed instructions on how to use the script.

In this case, the script I'm using to get rid of the Outlook window (closing it automatically as soon as it pops up) looks like this:


#IfWinActive ahk_exe SDLTradosStudio.exe

Loop

{
WinWait,Welcome to Microsoft Outlook 2016
WinClose,Welcome to Microsoft Outlook 2016
Send, y
}

How does it work? The script simply runs in a loop, waiting for a window called "Welcome to Microsoft Outlook 2016" to appear, and when it does, it closes it.

Hint: If your window has a different title, substitute it in the script. The window title has to match exactly for this to work.


But that's not the end of the story, because you know that after you try to close the window, you will see a message like this:


So that last line of the script sends the keystroke "y" to activate the "Yes" button in this window. Again, if your window says something different, substitute the appropriate keystroke in the script.

Here's a video showing Trados Studio's default behavior:


And here's what happens when the script is running:


Creating the AutoHotkey script and running it

First, download AutoHotkey here and install it. Don't expect to see anything different in your computer after installing the program. AutoHotkey runs in the background and allows you to run custom-made scripts to automate tasks.

To use this script, first you will need to create and AutoHotkey file.

1. In Windows Explorer, select a folder where you'd like to keep your script and right-click in any white space within the folder. From the menu, select New and then AutoHotkey Script.

2. Name your file.

The file, which will have an ahk extension, can be opened in a plain text editor, such as Notepad (I personally prefer Notepad++). Double-clicking the file won't open it, but instead it will load the script, making it active. To edit the file, you will need to either open it directly from within your text editor or right click on the file name and select Open with.

3. Open the file in Notepad (or your preferred plain text editor), and paste the script below the text already contained in the file.

4. Save and close the file.

5. Double-click the file to activate the script. After you do this, there will be a green square with a white "H" in it in your system tray.

And that's it! With the script running, that annoying Outlook window will be closed automatically as soon as it pops up.