Showing posts with label translation memories. Show all posts

Wednesday, January 9, 2019

SDL Trados Studio Quick Tips: Using TMX Content in Trados Studio

If you have translation memories in TMX format that you'd like to use in SDL Trados Studio, this is how you can do it.

Option 1 - TMX imported into an existing translation memory

If you already have a Trados Studio translation memory (*.sdltm) that you would like to add the contents of the TMX file to, you can import the file by following one of the procedures below.

a. In the Translation Memories view, open your existing translation memory, and click Import, then follow the steps needed to select your TMX file.


b. If your TM is active in a project, you can also start the import process from Project Settings - All Language Pairs - Translation Memories and Automated Translation.


Option 2 - New translation memory created from TMX file

If you would like to create a completely new TM from your TMX file, you can directly "open" the TMX in SDL Trados Studio. This will automatically convert the TMX to a Trados TM, by first creating the TM and then importing the TMX into the newly created TM.

a. From the Translation Memories view, select Open, and select *.tmx from the file type dropdown list.


b. The same procedure can be launched from Project Settings - All Language Pairs - Translation Memories and Automated Translation by selecting Use - File-Based Translation Memory. When this is done from Project Settings, the TM will be added to the active project.


Thursday, August 16, 2012

Using a TM with a Studio Project or File

Since this is often a source of confusion for new users, let's start by explaining that the Translation Memories view is not where you add or enable a TM to be used with a project or file in Studio.


What You Need to Do

To add your TM and be able to use it, first go to Project Settings. To make sure you add the TM to the right project/files, make sure you have double-clicked on your project in the Projects view to activate it. If you're working with a single-file workflow, save it in the Editor view and Studio will automatically create a project for you.


Then either right-click on the project or go to the Project menu, and choose Project Settings.

With Translation Memory and Automated Translation active, go to the right-hand panel and either Add a TM or Create a new one. Make sure the Enabled and Update checkboxes are checked. Any TMs you add here will be used in your project. No need to use only one, you can use as many as you like.


After you click OK, when you're in the Editor view with one of your project files open, the Translation Results window will show the TMs active for that project.


By going to Project Settings again, you can add or remove TMs from a project at any time.


Friday, July 27, 2012

Studio 2011 TM not updating? Check this box.

If you have been hard at work and notice your TM is not updating as you work, make sure the "Update" checkbox has been checked.

From the Editor view, go to Project Settings and select Translation Memory and Automated Translation, you will see this:

Now, expand your window to the right. This is a design flaw in Studio, the dialog box is cut-off and doesn't show you the Update checkbox, so it's easy to miss it unless you know it's there.

This is the expanded view of the window, and now you can see the Update checkboxes:


Put a checkmark next to each TM that you want to update as you work. One of the advantages of Studio over Trados 2007 is that you can store your translations in more than one TM at the same time, so check as many as you want. Click OK and you're good to go.

IMPORTANT NOTE: Any translations you entered BEFORE checking the Update checkbox will not be added to your TM, unless you do one of two things:

1. Go back to each segment and confirm it again. This will commit those previously translated segments to the TM. This is fine to do if you have only a few segments to reconfirm.

OR

2.  Go to the Files view, right-click on the file you have been working on, choose Batch Tasks and then either Update Main Translation Memories or Update Project Translation Memories, as the case may be. This is of course a better method for updating your TM with files that have lots of previously translated segments.


Wednesday, August 31, 2011

Using WinAlign to Add Previously Translated Text to Trados or Studio


If you have previously-translated documents in both your source and target languages, you can use WinAlign (an SDL Trados component) to add those translations to your translation memory. Here’s how.

1. Open WinAlign and select File –> New Project.

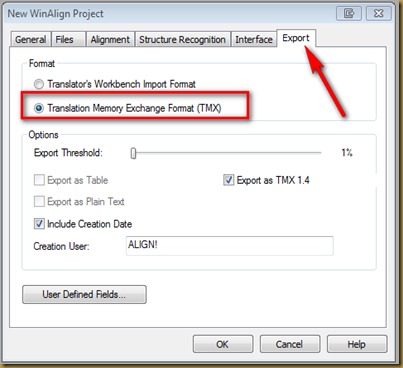
  • Before you get started, go to the Export tab and make sure that Translation Memory Exchange Format (TMX) is selected. This will ensure that the output of the alignment process is a TMX file that can be imported into either Trados or Studio. Otherwise, WinAlign will produce a TXT file that cannot be directly imported into Studio.
winalign5

2. Choose a name for your project and select the source and target languages, as well as your file type (a Word document in this example).

winalign1

The source and target languages chosen should match those of the Trados TM you will be importing the alignment results into.

2. Select the Files tab. You will see the screen below. Click on the Add button to add the files you will use for your alignment: one target file for each source file.

winalign2

3. After adding your files, click on the icon with the little pages and drag your mouse to “connect” each source file with its target file, so that WinAlign will know which two files it should align.

winalign3

NOTE: If there are several files to be aligned at one time, they can all be added and connected during this step.

When you’re done connecting your files, click on OK and you will see a screen like the one below.

winalign4

When you double-click on one of the files, the alignment process starts. When it’s done, you will see something like this:

image

The next step is checking the aligned segments. Click on OK to see the screen below. If you don’t see this screen, simply double-click again on one of the file names and it will open.

image

This window contains the alignment results. Check the segments to make sure the source and target match. If there is a mismatch, click on the little pages icon and “disconnect” the segments. Then connect the correct segments (click on the source segment icon and drag your mouse to the target segment icon). You can connect several segments to a single segment, if needed.

Any segments that are left disconnected won’t be exported as aligned.

Once you’ve gone over all your segments, it is time to create the TMX file that can be imported into Trados or Studio.

Go to File and select Export File Pair for a single pair or Export Project. Choose a name for the TMX file that will be created: the output of the alignment process is a TMX file that you can later import into Trados Workbench or Studio. WinAlign does not produce a ready-to-use translation memory.

This concludes the alignment. Now it depends on whether you want to use your alignment results in Trados or in Studio.

Trados

Go to Trados Workbench, open the TM into which you wish to import the aligned text, select File – Import, select the TMX file you created in WinAlign and click on OK.

image

When Workbench displays the message “Import finished successfully”, you have come to the end of the process and your aligned text is now part of your Trados TM.

Studio

Go to the Translation Memories view, select the TM you want to import the aligned text into, and select Import.

winalign6

Follow the steps to add the TMX file created in WinAlign and the translated text will now be available for use in Studio.

An alternative way of importing TMX files into your Studio TMs is through Project Settings.

In the Editor view, choose Project Settings:

winalign7

In the Project Settings window that opens, select the TM you want to add your aligned text to, then click on the Import button, and add the TMX file(s) you want to import.

winalign8

Follow the steps to complete the process. Now your aligned text will be available to be used while translating in Studio.