Friday, December 11, 2015

Segmentation Exceptions in SDL Trados Studio

In addition to creating custom segmentation rules, Studio allows us to add exceptions to new or existing rules. This post will explain how to do just that in Studio 2015.

A sample use case

In the example below, the translation for "Made in China" will propagate from segment 2 to segment 4, but this is not desirable in Spanish, as the verb needs to be singular in segment 2 and plural in segment 4, a distinction that exists in Spanish but not in English. Furthermore, there is gender to be taken into account, which in this case doesn't matter, but in other segments will make a difference.


Adding an exception to a segmentation rule

Segmentation rules are modified in each TM's settings. For this example, we will go to Project Settings - Language Pairs - All Language Pairs - Translation Memory and Automated Translation, select the appropriate TM and click Settings, then Language Resources - Segmentation Rules.


I will then select the Colon rule and click Edit.

At the bottom of the Edit Segmentation Rule window, select the Add button next to the Exceptions pane, and then the Advanced View button in the window that opens, to get to the Add Rule Exception window.


This is where we will tell Studio when NOT to segment after a colon, so let's keep our source text in mind to make sure we don't miss anything.

Battery: Made in China
Batteries: Made in China

I want Studio to ignore the colon segmentation rule whenever it comes across the phrase "Made in". The part that I need to change in the rule is what comes after the break, that is, when "Made in" appears after a colon, the colon rule should be skipped. It looks simple enough, but there is one little thing to keep in mind: there is also a space after the colon, and if I don't add that, the exception won't work. So what I really need is for the colon segmentation rule to be ignored when "space + Made in" is found after a colon.

\s represents any whitespace in regular expressions, and it's already included in the "After break" pane as shown above, so I just need to add "Made in" right after it.


After clicking OK, I see that the exception has now been added to the rule.


After closing all the open windows, it's time to process the file with the new segmentation. If my file had been added to my project before adding the exception, I will need to remove it, add it back and reprocess it for the exception to take effect.

And here's the resulting segmentation, just what I needed!


This example uses simple text content for the exception, but with regular expressions, even more powerful exceptions can be added to fit a variety of scenarios.


Wednesday, November 25, 2015

Beyond Punctuation: Creating Custom Segmentation Rules in Studio

A freshly created TM in Studio comes with 3 standard segmentation rules, as shown below.


While these rules are enough in most cases, sometimes we'll open a file and wish it were segmented differently, as in this case:


A quick look at this file makes it clear that it would be a lot easier to handle if "Dry Time" and "Wait Time" were in their own separate segments, so a custom segmentation rule would come in handy.

This new rule won't be punctuation-related, but instead, it will be content-related. In other words, I need Studio to create a new segment whenever the text "Wait Time:" or "Dry Time:" is found.

Adding a New Segmentation Rule

To access the segmentation rules, follow the path shown below.


This opens the Segmentation Rules window, where we will add the new rule.


Clicking Advanced View takes us to this window:


This is where we will tell Studio what we want to do. Before proceeding, let's think about what we want to do.


As shown above, we want to add a segment break (represented by the yellow line) right before "Wait Time:" and "Dry Time:", both of which are preceded by a space. In the window above, I need to tell Studio what pattern can be found before the (segment) break and after the break. So, in this example:

Before the break there is a space

and

After the break there is either "Wait Time:" or "Dry Time:"

To tell Studio what I want to do, I will need to use regular expressions, which for this example are not too complicated.


Explanation:

Before break
\s

  • \s is the regular expression character for whitespace


After break
(Wait|Dry) Time:


  • The | indicates alternation, so it's telling Studio to look for either "Wait" or "Dry"
  • The parentheses are used to group the two alternatives, as otherwise Studio would look for "Wait" or "Dry Time:", that is, it would not combine "Wait" and "Time:"
Note that I'm including the colon in the "After break" expression. This is to prevent unwanted segmentation in segments like "Wait Time cannot be longer than Dry Time."

After clicking OK, the rule is now included in the list of segmentation rules.


After closing all the open windows. The new rule is now available to be applied during processing. 

To apply it to my file, I will need to first remove the file from my project, add it again and process it as usual, as shown in this short video.


And that's all there is to it! After re-processing the file, I now have the segmentation I wanted.


Friday, November 6, 2015

Combining TMs in Studio: TM Import and TM Upgrade


When we need to combine the contents of two or more TMs, we have two operations available in Studio: Importing and Upgrading Translation Memories.


The main difference is the end result:
Upgrading TMs will produce a new TM.
So, TM1 + TM2 = TM3

Importing TMs will modify an existing TM.
So TM1 + TM2 = TM1 (including all the contents of TM2)


Let's have a look at the basics of each method.

For this example I have two simple TMs called Red and Yellow, shown here in the Translation Memories view. I’ve added an identical TU (Yellow-Amarillo) to both TMs so we can see what happens to that kind of content.

image

image


Method 1: Upgrading TMs

Note: This will create a new TM that will include the contents of all the selected TMs.

First, I click Upgrade Translation Memories from the Home tab in the Translation Memories view.

image

For our example, I will add the two file-based TMs I created, so I select “Add File-based TMs…”, then go to the folder where my TMs are stored.

Note: Selecting All Supported Files in the drop-down menu next to the File name ensures that Studio TMs (sdltm) are also visible.

image

I select the files I want to merge and click Open.

image

Then I click Next.

In the Output Translation Memories window, the first option is to create one TM for each of the selected TMs. This is useful when upgrading a Legacy TM to Studio’s sdltm format. For our example I want to merge the two TMs, so I’ll use the second option: Create output translation memory for each language pair.

Note: Studio gives the new TM a default name that is made up of the source and target language codes. In this example, Studio gives me the default TM name en-US_es-MX. Double-clicking on this name allows me to edit it to give the TM a specific name; in this case, I’ve changed it to Red+Yellow.

image

Click Next.

The next window allows us to select some settings for the TM merge operation. The screenshot below shows the Settings tab. I left all the default settings intact for this example.

image

After clicking Finish, I see a window summarizing the operation. Looking at the list of steps, we can see that it’s basically an Export+Import sequence, where each of the selected TMs is first exported, then a new TM is created and finally, each of TMs is imported into the new TM.

image

This is what the new TM looks like. The identical TU in both TMs (Yellow – Amarillo) gets merged into a single TU in the new TM so there will be no duplicates.

image


Method 2: Importing one TM into another one


Note: With this method, the original TM is modified to include the new TUs.

If the TM to be imported is in sdltm format, it will first need to be exported to a TMX file.
For our example, I will import the contents of the Yellow TM into the Red TM.
First, to export the Yellow sdltm file to a TMX file, from the Translation Memories view, I select the TM and click Export in the ribbon.

image

After clicking Save I will have a TMX file.

Next, I select the Red TM and click Import, selecting the TMX file I just created.

image

After clicking Open and Next, the last screen before the actual Import operation allows me to choose some settings.

image

Again, I left all the default settings intact and clicked Finish. After the import operation is complete, the Red TM is showing the newly-added TUs. Since TU 3 (Yellow-Amarillo) is identical in both the original and the exported TM, only one copy is kept, avoiding duplicates.

image


And that’s all there is to it.

Both operations are simple and easy to access, and it’s a just a matter of deciding which output best fits our intended purpose.


Tuesday, September 29, 2015

Translating AutoCAD Drawings: TranslateCAD + Studio

Translating AutoCAD files may seem like a daunting proposition. After all, it's not an everyday file format for many of us. Luckily, there's a way to handle them with relative ease in SDL Trados Studio with the assistance of a separate program called TranslateCAD and a little file type customization via regular expressions.

1. Preparing the files

If the source files are DWGs, the first step will be converting them to DXFs, as TranslateCAD can only process files in DXF format. If AutoCAD is not available for the conversion, a free program like DraftSight will work as well.

2. Extracting text with TranslateCAD

Start TranslateCAD, navigate to the folder containing the DXF files, select all the files that need to be translated and click the Extract Text button.


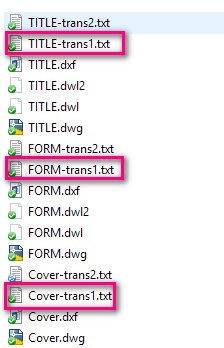
TranslateCAD will create two text files for each DXF, adding "trans1" and "trans2" to the name. The "trans1" files contain the translatable text, so those are the ones to be used in Studio, while the "trans2" files should be left untouched.


3. Customizing the Studio TXT file type*

*This step will only need to be completed once if the same file type settings will be used to process future AutoCAD-based TXT files.

The TXT file produced by TranslateCAD includes some content that is not translatable text, as shown here:


Opening the file in Studio with the default TXT file type settings will result in each of those lines being included as a translatable segment. To exclude them, we can customize the file type by adding regular expressions to tell Studio to interpret that text as inline tags, and therefore non-translatable.

We can do this for all future projects and single files by going to Options > File Types > Text, or only for our active project by going to Project Settings > File Types > Text.

Once the Text file type is selected, we go to Inline tags and click the Add rule button.


When the Add inline rule window opens, we select Placeholder for the Rule Type and enter our regular expression in the Rule Opening field:


After clicking OK, the rule will be added to the list. Additional rules can be added by repeating this procedure.


These are a few examples of regular expressions that can be useful when working with AutoCAD files.

Regular Expression
Description
Sample captured text
^#+\d+#+$
A segment starting with two pound signs followed by one or more numbers and ending in two pound signs
##000001##
^\d+$
A numbers-only segment
264
^[A-Z]$
A segment consisting of a single uppercase letter
A

Once the appropriate rules have been added, we can close the Options (or Project Settings) dialog box.

A bug-related update (April 2016)
Paul Filkin has brought to my attention that there is a bug in SDL Trados Studio 2015 SR2 that causes the above procedure to fail, for which he has found a workaround. This may be helpful for anyone who comes across this issue.

Paul writes:

In the current version of Studio this doesn’t seem to work.  I’ve logged a bug and found a workaround by adding these things to the structure as opposed to inline tagging:


4. Translating the files in Studio

Now that everything is ready, we can add the TXT files to Studio, and process them as we normally would, translate them and generate the target files. Since our target files should replace the original TXT files, the name should remain unchanged and they should be placed in the same folder as the original source files.

5. Converting the translated TXT files back to DXF

Once the target TXT files are ready, we go back to TranslateCAD and use the "Join TXT files to recreate Translated DXF" feature. It's a simple matter of selecting the files we need to convert and clicking Re-Construct DXF.


TranslateCAD will produce new DXF files with "trans" appended to the name.

6. Converting the DXF files to DWG

For the final step we will need to go back to AutoCAD or DraftSight and save the DXF files as DWGs.

And that's it! This may sound complicated, but in fact, once we've set up the file type regex rules, any future files can be processed rather quickly.


Sometimes it’s the Little Things: Managing Abbreviations for Better Segmentation

One of the main sentence-level segmentation rules in Studio uses a full stop to indicate the end of a sentence and therefore the end of a segment. For most jobs, this default segmentation works well, but what if our source text looks like this?


Since Studio interprets each of those periods as the end of a sentence, our file will look like this:


If word order is different in the source and target languages, working with this file will mean entering the translation and locking each segment without confirming it, which means the new translations won’t be added to the TM, which will result in losing all concordance and propagation benefits, as well as any potential future leverage. And if the file has hundreds or thousands of segments like this, productivity can be significantly affected.

Luckily, there’s a simple solution to this: adding “ELEC.”, “HYDR.” and “SYS.” (or any relevant abbreviations, of course) to Studio’s list of recognized abbreviations. Basically, Studio will create a new segment after every period, except when that period is used as part of an abbreviation, so we can make use of this feature, as the list of abbreviations can be edited in the Translation Memory’s settings. Here’s how to do it.

First, go to your TM settings, then Language Resources > Abbreviation List, and click Edit.


This opens the Abbreviations list. Scroll to the bottom and add your abbreviations.


After clicking OK 3 times to close the TM settings window, the new abbreviations will now be recognized by the TM and therefore Studio will ignore them when segmenting a file.

Note that this new segmentation cannot be applied to an existing SDLXLIFF file, which is already segmented, so the source file will need to be processed again by either adding it to a project or opening it as a single file, using the TM that contains the new abbreviations.

After doing so, we get the following Studio file for our example above.


Much better!

As a final note, keep in mind that abbreviations are part of the Translation Memory, which means we can customize them as needed, based on our various files and projects.


Wednesday, August 19, 2015

Words Breaking Up Arbitrarily at Line End? Asian Language Rules May Be the Reason

After spending the better part of an afternoon troubleshooting some files, I'm writing this post both as a troubleshooting record for myself and to help others out there who may be facing the same issue, hoping it will save someone some time.

The Issue
I recently worked on a project involving a large number of MS Word files. The source text was in English, the files needed to be translated into Spanish. Our team used SDL Trados Studio for the translation and everything seemed to go smoothly... until we opened the target files in Word and started seeing some odd word breaks at the end of lines. Words were breaking up arbitrarily, as shown in the example below.


The Source of the Issue
As it turns out, even though the documents provided for translation were in English, the original files had been created in Korean. This means that Asian language features were carried over in the document paragraph styles.

Looking at the style for the odd-looking text revealed three settings I didn't remember having seen before: "Allow text to wrap in the middle of a word", "Don't adjust space between Latin and Asian text" and "Don't adjust space between Asian text and numbers".


Of these, "Allow text to wrap in the middle of a word" seemed the likely culprit, but my usual paragraph settings didn't offer a way to disable it. To be able to do this, Asian Language Support had to be installed on my computer.

The Solution
The first thing I had to do was download an Asian language pack. I chose Korean because that was the language used when creating these documents.

To download a language pack in Windows 10, I went to my computer clock on the taskbar, clicked on it and selected Date and time settings at the bottom, then Region & language in the window that opens. On the right pane, under Country and region, I could see my installed languages, and clicked on the "+" next to "Add a language". Then found Korean and clicked on it. After a couple of minutes, when I could see "Language Pack Available" next to Korean, I clicked on it and then "Options". At this point the language pack is not yet installed on the computer, so the last button to click before this happens is the "Download" button under Language Options.

Once this was complete, I shut down and restarted Word (I'm using Word 2013).

I then opened one of my problem documents in Word, and right-clicked on the "Normal" style (Home tab - Styles group) and selected Modify. in the Modify Style window, I then clicked on Format - Paragraph. The dialog box that opens now has a new tab: "Asian Typography". And the second setting on this new tab is "Allow Latin text to wrap in the middle of a word".


As soon as I uncheck the box, text wraps correctly.


Note: This setting may need to be changed for each individual style that shows this issue.


Thursday, July 23, 2015

A Collection of Regular Expressions for the Regex Match AutoSuggest Provider

The Regex Match AutoSuggest Provider app is one of my absolute favorite add-ons for Studio, and it has been a great reason to continue learning about regular expressions.

What does it do?
Based on rules that you can set up on-the-fly, the plug-in offers AutoSuggest proposals, as shown in this example:


Depending on how you set up your rules, the plug-in can:

  1. Offer an autosuggestion that is exactly the same as the word or phrase found in your source segment, so all you have to type is the first letter, instead of the whole thing. For example, you can have a rule that will suggest an entire phone number string, such as "1-800-012-3456", as soon as you type the first number.
  2. Offer an autosuggestion where the source text has been replaced by its translation. So, for example, when "July 22" is found in the source, "22 de julio" will be offered as an autosuggestion as soon as you type the first "2".
What do you need to use it?
First, you need to download the plug-in from the SDL Open Exchange and install it. The Regex Match AutoSuggest Provider is available for Studio 2014 (and soon for Studio 2015).

Once installed, it is found under the View tab in Studio. Clicking on the button will open the pane where you can start entering your RegEx Entries.

The developer provides a very clear explanation of the set-up here.

You can safely close this pane when you're not entering any new rules, and open it again as needed. I find it useful to have it open as I work, so I can quickly add new rules as I need them.

Some examples
Here are some rules and examples of their application, with a disclaimer: I'm a novice regex user, so please don't expect these to be the most elegant or sophisticated regex rules out there. In venturing into creating regex rules to use with Studio, I decided to follow Paul Filkin's advice about "economy of accuracy" and move past my worry of creating clunky regular expressions, so you may find some clunkiness here, but hopefully these will be useful either as they are, or as a starting point to achieve something else.

Date: First day of the month

Description
Regex Pattern
Replace Pattern
Dates: First of month Ex: July 1, 2015 --> 1° de julio de 2015
(#Months#)\s(1|1st),\s(\d{4})
1° de $1 de $3
 Note: The "#Months#" part of the expression is a reference to a variable from a list, in this case, the names of the months, another very clever feature of the plug-in. You can watch Paul Filkin's video Manipulating Dates with RegexMatch AutoSuggest for a clear explanation of this feature.


Date: Full date


Description
Regex Pattern
Replace Pattern
Dates: July 22, 2015 ---> 22 de julio de 2015
(#Months#)\s(\d{1,2}),\s(\d{4})
$2 de $1 de $3


Date: DD/MM/YY 

Description
Regex Pattern
Replace Pattern
Dates: 8/7/15 to 7/8/15
(\d{1,2})/(\d{1,2})/(\d{2})
$2/$1/$3


Date: Month and Year

Description
Regex Pattern
Replace Pattern
Month and year  Ex. July 2015 --> julio de 2015
(#Months#)\s(\d{4})
$1 de $2


Date: Day and Month

Description
Regex Pattern
Replace Pattern
Month and day w/o year. Ex. July 22 --> 22 de julio
(#Months#)\s(\d{1,2})(?!.*\d{4})
$2 de $1


1x

Description
Regex Pattern
Replace Pattern
Ex: 1x ---> 1 vez
\b1x\b
1 vez


50x

Description
Regex Pattern
Replace Pattern
Ex: 10x ---> 10 veces - excluding "1x"
(?!1x)(\d{1,2})x
$1 veces


5-6

Description
Regex Pattern
Replace Pattern
Ex: 8-10 ---> de 8 a 10
(\d{1,2})-(\d{1,2})
de $1 a $2


1-800 number

Description
Regex Pattern
Replace Pattern
Full phone numbers Ex. 1-800-123-1234
\d-(\d{3})-(\d{3})-(\d{4})
$0


8:00 a.m.

Description
Regex Pattern
Replace Pattern
Time plus a.m. or p.m. Ex. 9:00 a.m.
(\d{1,2}:\d{2})\s(a\.|p\.)m\.
$0


Numbers with backslashes


Description
Regex Pattern
Replace Pattern
Numbers with points and slashes Ex. 36.5/93
\d+\.\d+/\d+
$0


Percentages

Description
Regex Pattern
Replace Pattern
Percentages  Ex. 35%
\d{1,3}%
$0


Trademark names

Description
Regex Pattern
Replace Pattern
Words with TM Ex. AnyBrand™
\w+™
$0


Registered names

Description
Regex Pattern
Replace Pattern
Words with (R) Ex. AnyBrand®
\w+®
$0


Watch a video demonstration of the above here.


And here's the full list of the examples shown above.
Description
Regex Pattern
Replace Pattern
Dates: First of month Ex: July 1, 2015 --> 1° de julio de 2015
(#Months#)\s(1|1st),\s(\d{4})
1° de $1 de $3
Ex: 1x ---> 1 vez
\b1x\b
1 vez
Ex: 10x ---> 10 veces - excluding "1x"
(?!1x)(\d{1,2})x
$1 veces
Dates: July 22, 2015 ---> 22 de julio de 2015
(#Months#)\s(\d{1,2}),\s(\d{4})
$2 de $1 de $3
Ex: 8-10 ---> de 8 a 10
(\d{1,2})-(\d{1,2})
de $1 a $2
Dates: 8/7/15 to 7/8/15
(\d{1,2})/(\d{1,2})/(\d{2})
$2/$1/$3
Month and day w/o year. Ex. July 22 --> 22 de julio
(#Months#)\s(\d{1,2})(?!.*\d{4})
$2 de $1
Full phone numbers Ex. 1-800-123-1234
\d-(\d{3})-(\d{3})-(\d{4})
$0
Time plus a.m. or p.m. Ex. 9:00 a.m.
(\d{1,2}:\d{2})\s(a\.|p\.)m\.
$0
Numbers with points and slashes Ex. 36.5/93
\d+\.\d+/\d+
$0
Month and year  Ex. July 2015 --> julio de 2015
(#Months#)\s(\d{4})
$1 de $2
Percentages  Ex. 35%
\d{1,3}%
$0
Words with TM Ex. AnyBrand™
\w+™
$0
Words with (R) Ex. AnyBrand®
\w+®
$0


And that's all there is to it. What I like about the Regex Match AutoSuggest Provider is that it's easy to use (although some basic knowledge of regex is required) and it's project-independent, which means the entries are available all the time, for all files and projects, so it's a great way to customize Studio's autosuggestions to our individual needs.