Monday, July 30, 2012

Handling Bilingual (Unclean) Word Files in Studio 2011

UPDATE: If you have Studio 2014, check out my new how-to for the SDL Open Exchange App LegIT! for quick conversion without using Trados 2007.

----------

For those of us who still work frequently with bilingual Word files (also called "unclean"), the news that Studio 2011 would be able to handle bilingual Word files (since Studio 2009 doesn't) and thus give us some backward compatibility with Trados 2007 was most welcome.

Below is the process for handling bilingual Word files in Studio 2011.

There are 3 steps in the process:

1. Create a bilingual file in Trados 2007
2. Open and translate/edit the bilingual file in Studio 2011
3. Save target as bilingual in Studio 2011

Step 1. Create a bilingual file in Trados 2007

You would normally start with a regular Word file (*.doc), which looks like this in Word, when paragraph marks are set to show:


Since bilingual files returned to our clients will very likely be opened in Trados 2007, the initial segmentation needs to be completed in Trados 2007. (Note that any content that is not segmented in Trados 2007 Workbench will not show in Studio.)

To do this, go to Trados Workbench (this is not part of Studio, it's a separate program, part of Trados 2007; if you haven't downloaded and installed Trados 2007 from your SDL account, do so first) and choose Tools-Translate.


Select your file, make sure "Segment Unknown Segments" is checked, and click on Translate. For this process, you can use an empty Trados TM, which will result in segments being created and the source text transferred to the target segments. If you use a TM that already has some matches for your file, those segments will be populated with their translations, and the unmatched segments will simply be created with the source text copied to the target.


IMPORTANT NOTE:
For this to work, your source file MUST have a DOC extension (Word 97-2003 file). If you run a DOCX (Word 2007 or 2010 file) through the Translate process, you will get a TTX (TRADOStag) file instead of a bilingual Word file. So, if necessary, save your source file as Word 97-2003 first.

Once Workbench is finished (it shouldn't take more than a few seconds), the file is ready to be processed in Studio 2011. Please note that this process will overwrite your source file with a segmented Word file, so if you need to keep your original Word file, rename it before running the Translate process.

After the Translate process, the Word file looks the same on the surface, but if you set paragraph marks to show, you will see that the file has been segmented:


Step 2. Open and translate/edit the bilingual file in Studio 2011

*For this example I will use a single-file workflow, but you can just as easily create a project and add your bilingual file(s) to the project.

In Studio 2011, choose Open Document and find your newly segmented file, click on Open.You will see the source and target columns, with the target column populated with the source text.


If you prefer to work from empty segments, select all the target segments, right-click and select Clear Target Segment.

Now your file is ready to be translated in Studio.


When finished, go to the File menu, Save Target As and either overwrite your original file or give it a new name.

When you go back to Word and open the file, you'll see a fully-translated bilingual Word file, where only the target is visible with Paragraph marks set to Hide.


If you choose to Show Paragraph Marks, you will see this:


This type of bilingual file is also called an "unclean" file.


GoodNotes, a Great Note-Taking App to Use as a Whiteboard

For several months now, I have been trying a number of apps to use as a whiteboard.

My requirements are:

  •  Ability to annotate PDFs
  • Zoom box for fine writing
  • Smooth ink
  • Easy in and out zooming
  • Ability to hide controls while projecting
Like many others, I have tried many note-taking, whiteboard and PDF annotation apps, and while they all have something I like, there hadn't been one that made me feel like I'd found "the one". Until recently.

For the past couple of months I have been using GoodNotes (www.goodnotesapp.com) and I have been very impressed.

My projection set-up is an Epson projector plus an Apple TV for wireless projection of my whiteboard. I use an iPad 3 (somehow "the new iPad" doesn't feel like the right name!).

With GoodNotes, I can easily import PDFs to annotate during class, so my Powerpoint presentations have been converted to PDF for this purpose, and I have scanned some textbook chapters as well. Since my Dropbox account is linked to GoodNotes, transferring files from my computer is a breeze.

GoodNotes has a nice bookshelf look, where all my "notebooks" appear neatly arranged.


The app's controls are easy to use and highly intuitive.

The zoom box for fine writing is what first caught my eye in GoodNotes. With recent updates there are two options to open up the zoom box, you can either do a long tap and then select the icon, or simply select the icon on the toolbar.
As for smooth ink, it hadn't been GoodNotes' strong suit, the ink was just average. But the developer has been hard at work and much-improved inking is coming soon! I'm excited to say I got to try it in beta today and it is simpy amazing. You can choose between a fountain pen or a rollerball pen to suit your preference.
 
Now, the features that make this app a winner in my book are its zooming capabilities and PDF rendering. Even with large PDFs and the iPad 3's demanding retina display, you can zoom in to see a lot of detail in your PDF or make really small notes, and the app performs perfectly. This is a great plus when using the app as a whiteboard in class. There's no noticeable lag or blocky re-drawing of the PDF as I have seen with other apps (I used to like Remarks, but after the last update PDF performance was significantly affected and it hasn't been fixed; I wish Notability also performed better in this regard, but PDF rendering is very poor in my opinion).
This shows a zoomed-in version of the same table shown above.

For the last point in my list of requirements, easy to use with a projector, with controls being hidden on the projected image while still present on the iPad screen, GoodNotes also gets high marks. My students don't have to see when I'm picking a new color or line width, all they see on the screen is the final uncluttered image while I retain full control on my iPad.

GoodNotes also allows you to type, import pictures, highlight, select and move annotations.

And lastly, something that really makes a big difference for me: this app has an outstanding developer. He's very responsive to user requests, keeps the users in the loop through his blog and tweets (goodnotesapp.com/blog) and is constantly working on developing his app.

So, when I'm back in my Teacher Training classroom in a few weeks, GoodNotes will be there with me, without a doubt!


Same Segment, Multiple Translations in Studio 2011

Unlike Trados 2007, Studio 2011 doesn't require a specific TM setting to store multiple translations for the same segment in the TM. All we need to know is the right keyboard shortcut when committing a new translation to the TM.

To store multiple translations for the same segment, simply use Ctrl+Alt+Up (Add as new translation) to commit the new translation to the TM. Note that this keyboard shortcut is user-changeable via Tools-Options-Keyboard Shortcuts-Editor > TM Window.


When a segment comes up for which there is more than one translation in the TM, simply use Alt+1, Alt+2, etc. to choose the relevant translation to populate the target segment.

Friday, July 27, 2012

Changing Segmentation in SDL Trados Studio 2011

For those occasions when Studio's standard segmentation won't do, the following steps will help you customize your file's segmentation to your liking.

 Let's say I have a source file that has tabs in it, like this simple Word file:


After adding my file to a project, and translating the first segment, it looks like this:


We can easily see that if the file were segmented differently, I would be able to leverage my translations much better, with each individual country name being on its own separate segment.

To achieve this, I go into Project Settings, then Translation Memory Settings:


In the window that opens, select Language Resources on the left, and then Segmentation Rules on the right, then click on Edit:


This brings up one more box. For this example, since I want Studio to create a new segment every time it finds a tab, I need to choose Add:


To create a segmentation rule based on tabs, I add a name (Tab), choose "Anything" in the "Before break" dropdown menu, "Tab" in the "Break characters" dropdown menu, and "Anything" in the "After break" dropdown menu:


 Click OK several times to close all the open dialog boxes.

Now I go back to my project, remove the Word file I was working on, add it again, prepare it, and this is what I see:


Much better!

From now on, whenever I use this TM, a new segment will be created  whenever there is a tab. If I want to remove this segmentation rule, I simply go back to the Segmentation Rules dialog box, select the rule I created and click on Remove.

This is a simple example using tabs, but Studio is powerful enough to provide a great range of possibilities by playing with the various options provided.

Studio 2011 TM not updating? Check this box.

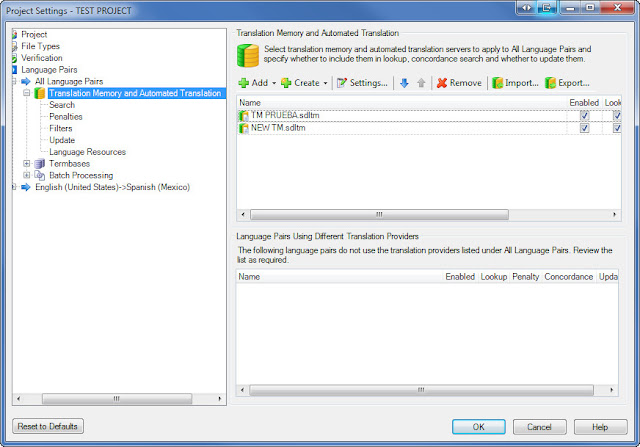
If you have been hard at work and notice your TM is not updating as you work, make sure the "Update" checkbox has been checked.

From the Editor view, go to Project Settings and select Translation Memory and Automated Translation, you will see this:

Now, expand your window to the right. This is a design flaw in Studio, the dialog box is cut-off and doesn't show you the Update checkbox, so it's easy to miss it unless you know it's there.

This is the expanded view of the window, and now you can see the Update checkboxes:


Put a checkmark next to each TM that you want to update as you work. One of the advantages of Studio over Trados 2007 is that you can store your translations in more than one TM at the same time, so check as many as you want. Click OK and you're good to go.

IMPORTANT NOTE: Any translations you entered BEFORE checking the Update checkbox will not be added to your TM, unless you do one of two things:

1. Go back to each segment and confirm it again. This will commit those previously translated segments to the TM. This is fine to do if you have only a few segments to reconfirm.

OR

2.  Go to the Files view, right-click on the file you have been working on, choose Batch Tasks and then either Update Main Translation Memories or Update Project Translation Memories, as the case may be. This is of course a better method for updating your TM with files that have lots of previously translated segments.


Wednesday, July 25, 2012

AutoSuggest gets even better with Studio 2011 SP2

AutoSuggest has always been one of my favorite Studio features, but what I didn't like was the fact that it was case sensitive. Suggestions from termbases, translation memories and AutoText entries were only offered if the translator started typing the entry in the same case it was stored in.  My workaround for this was storing frequently-used items in a variation of case combinations. As an example, for the phrase "for example", my termbase included the following Spanish translations:

POR EJEMPLO
por ejemplo
Por ejemplo

This meant more work, of course, and could only be done with Multiterm termbases and AutoText entries, and not with suggestions coming from AutoSuggest dictionaries (which are automatically created by Studio from TMs and not user-editable).

With the release of Studio 2011 SP2 a few days ago, this is no longer an issue. There is now an option to enable/disable the case-sensitive feature of AutoSuggest. Here's how to do it.

Note: If you haven't downloaded SP2 yet, make sure you do, as this feature is not found in previous releases.

Go to Tools - Options - AutoSuggest, you will see this screen:


The checkbox is checked by default, so if you liked the original AutoSuggest behavior, just leave it checked.

Uncheck the Case sensitive checkbox if you want AutoSuggest to override the case of your entries. With "Case sensitive" unchecked, suggestions are adapted to the first letter you type, whether uppercase or lowercase, as shown here:


I think other Studio users will agree that this is certainly one of those little things that make a big difference.