1. Preparing the files
If the source files are DWGs, the first step will be converting them to DXFs, as TranslateCAD can only process files in DXF format. If AutoCAD is not available for the conversion, a free program like DraftSight will work as well.
2. Extracting text with TranslateCAD
Start TranslateCAD, navigate to the folder containing the DXF files, select all the files that need to be translated and click the Extract Text button.
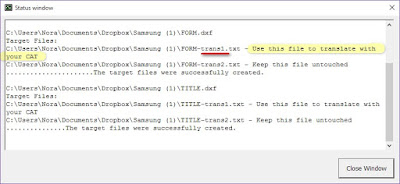
TranslateCAD will create two text files for each DXF, adding "trans1" and "trans2" to the name. The "trans1" files contain the translatable text, so those are the ones to be used in Studio, while the "trans2" files should be left untouched.
3. Customizing the Studio TXT file type*
*This step will only need to be completed once if the same file type settings will be used to process future AutoCAD-based TXT files.
The TXT file produced by TranslateCAD includes some content that is not translatable text, as shown here:
Opening the file in Studio with the default TXT file type settings will result in each of those lines being included as a translatable segment. To exclude them, we can customize the file type by adding regular expressions to tell Studio to interpret that text as inline tags, and therefore non-translatable.
We can do this for all future projects and single files by going to Options > File Types > Text, or only for our active project by going to Project Settings > File Types > Text.
Once the Text file type is selected, we go to Inline tags and click the Add rule button.
When the Add inline rule window opens, we select Placeholder for the Rule Type and enter our regular expression in the Rule Opening field:
After clicking OK, the rule will be added to the list. Additional rules can be added by repeating this procedure.
These are a few examples of regular expressions that can be useful when working with AutoCAD files.
Regular Expression
|
Description
|
Sample captured text
|
^#+\d+#+$
|
A segment starting with two pound signs followed by one or more
numbers and ending in two pound signs
|
##000001##
|
^\d+$
|
A numbers-only segment
|
264
|
^[A-Z]$
|
A segment consisting of a single uppercase letter
|
A
|
Once the appropriate rules have been added, we can close the Options (or Project Settings) dialog box.
A bug-related update (April 2016)
Paul Filkin has brought to my attention that there is a bug in SDL Trados Studio 2015 SR2 that causes the above procedure to fail, for which he has found a workaround. This may be helpful for anyone who comes across this issue.
Paul writes:
In the current version of Studio this doesn’t seem to work. I’ve logged a bug and found a workaround by adding these things to the structure as opposed to inline tagging:
4. Translating the files in Studio
Now that everything is ready, we can add the TXT files to Studio, and process them as we normally would, translate them and generate the target files. Since our target files should replace the original TXT files, the name should remain unchanged and they should be placed in the same folder as the original source files.
5. Converting the translated TXT files back to DXF
Once the target TXT files are ready, we go back to TranslateCAD and use the "Join TXT files to recreate Translated DXF" feature. It's a simple matter of selecting the files we need to convert and clicking Re-Construct DXF.
TranslateCAD will produce new DXF files with "trans" appended to the name.
6. Converting the DXF files to DWG
For the final step we will need to go back to AutoCAD or DraftSight and save the DXF files as DWGs.
And that's it! This may sound complicated, but in fact, once we've set up the file type regex rules, any future files can be processed rather quickly.


